Handsomely Suited goes casual

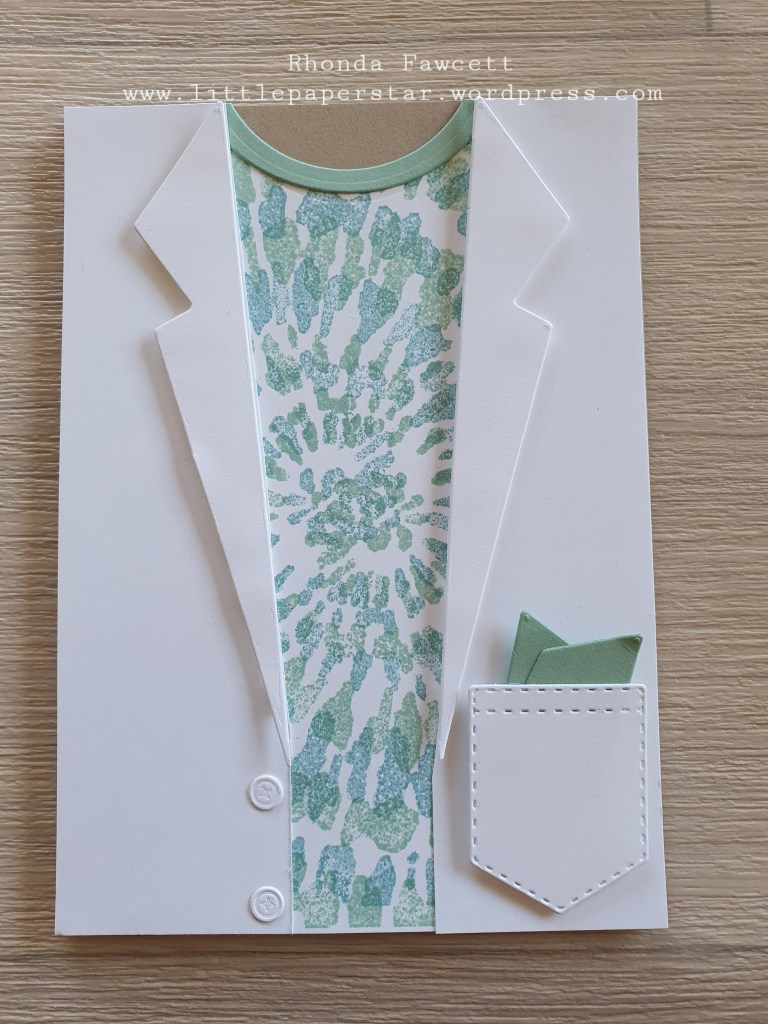
When I first got my hands on the large spiral stamp I knew I had to make a card featuring a tie died tee.

It brings back memories from the late 70’s and early 80’s. Which got me thinking about the show Miami Vice and the white suits and tee shirt combo that Don Johnson’s character was famous for. So I decided to create this look using our well suited dies.

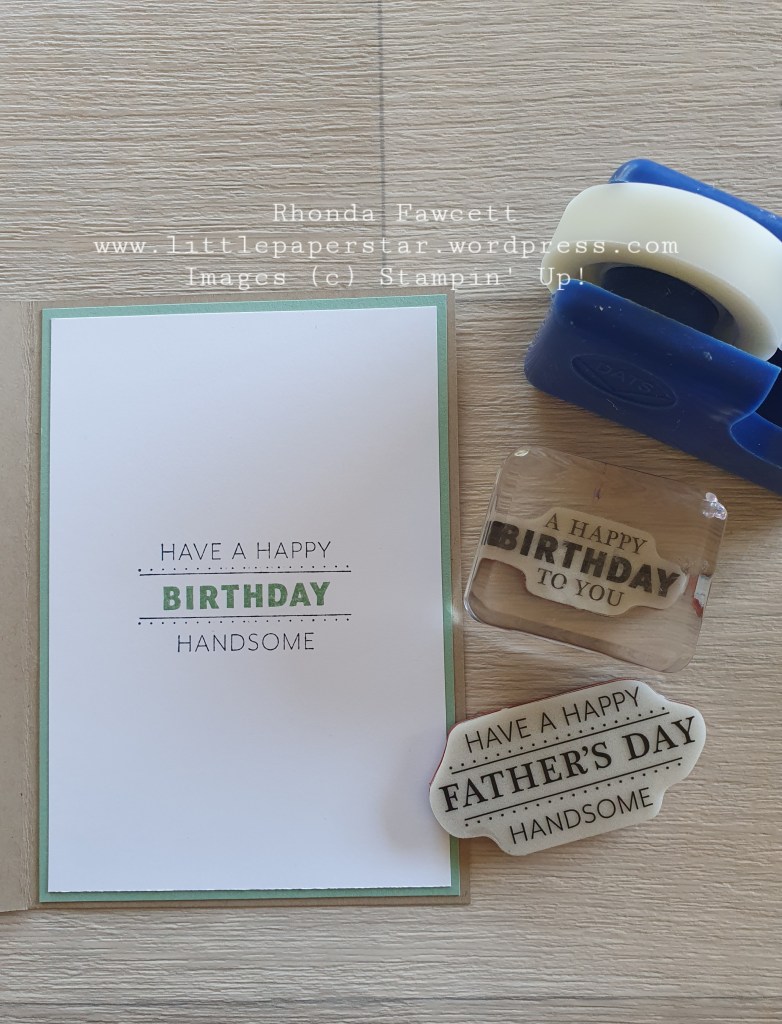
For the inside of the card, I wanted to use a combo of stamps as I liked the word “handsome” but I didn’t want Father’s day. I used a removable tape to cover up the words “Father’s Day” on the rubber stamp. I inked up my stamp in Memento Black. Then removed the tape… very important! This meant there was no ink of the words “Father’s Day”. I stamped it onto my card.

It read (in black), Have a Happy…. Handsome. Next I used the tape to mask off the words “A happy” and “To you” on the second rubber stamp so that only the word birthday was exposed to the ink. I inked it up in Mint Macaron, removed the tape and stamped it in the gap of my previously stamped image.

Perfume Pop Up Card

This classy card uses the Dressed to Impress stamp set and the recently retired Peony garden designer series paper.

Card colours are Basic Black, Basic White, Gray Granite, Petal Pink and Flirty Flamingo.

The perfume bottle is covered with a lovely hint of fine glitter using the Wink of Stella pen. It doesn’t show in the photo but looks lovely in real life.

Inside the card, is two surprise pop up panels. The images are also from the Dressed to Impress stamp set. The Lipstick image has a dusting of Dazzling Diamonds glitter. The pop up panel on the right is mostly left empty so you can write your greeting.

The two Basic White backgrounds are embossed with the Tasteful Textile embossing folder.

Flip and Pop Card

This fun pop up card is super easy to make.
Here are the instructions:
Fold A5 card in half and cut a shape out of the front for the window in which to insert the flip piece. Save the piece that was cut out as this is used again to sit inside the window.
Decorate front as desired. If you want to add a piece of DSP (Designer Series Paper), add it first before cutting out the window shape. Cut your DSP to 14.4 cm x 10 cm.

Pop Up Mechanism: Cut a strip of coloured card to match the front card colour to measure 10 cm x 8 cm. Score at 2.5, 5 and 7.5 cm. Fold along all score lines in the same direction.
Adhere this mechanism inside the card, butted up against the fold line so that it makes a box shape as demonstrated in class.
Flip Mechanism: Cut a strip of card same colour as before to measure 6.5 cm x 2 cm. Score at 2.5cm.
Adhere the longer fold section onto the pop-up box piece. Fold the score line back on itself and close the card then reinsert the cut-out shape back into the window and adhere to the smaller folded back section of the flip mechanism.

Decorate the inside of the card by cutting a piece of white card to 14.4 cm x 7 cm and stampin your chosen sentiment.

If you get stuck, with these directions watch this YouTube video below
Pop and Flip card. – YouTube

Love you Duck punch art card

Is there anyone else like me, who thought the strawberry in the strawberry punch looked like a duck’s bill?

I have been thinking that for awhile so today I had a go at making a punch art duck.

I used the strawberry builder punch for the bill and the fluff on the top of the duck’s head. The head is punched with the large balloon from the Balloon Duo punch. The body and wings are layering oval dies. The heart inside the speech bubble is from the Snailed it bundle. The waves are from the magnolia dies and lake grass is from Sea of Textures dies.

Please let me know if you like it. I love hearing your feedback.

Double Diamond Fold Tulip Card

Today I want to show you a Double Diamond fold card. The tricky bit is getting your score and folding lines right. I found it easiest to practice on copy paper first.

I adapted this card from one I saw online and made it so it would work using our A4 cardstock that we use in NZ. I started with a piece of card measuring 29 x 13 cm. Then I scored in half (in portrait position) at 6.5 cm. Turn to landscape for more scoring and marking. Score length of card at 6.5 cm. Move to 9 cm, do not score but instead make a mark at the centre score line at 9 cm. Move to 11.5 cm. Make a mark at the top and bottom of your card. Move to 17.5 cm. Make a mark at the top and bottom of your card. Move to 20 cm. Make a mark on the centre score line. Move to 22.5 cm. Score down the length of your card.

Now take a ruler and bone folder and score from the 11.5 mark to the middle 9 cm mark. Do this top and bottom. Then the same on the other side; score from the 17.5 mark to the middle 20 cm mark on both the top and bottom. You will have a diamond shape in the middle

The two outside panels are mountain folds. The diamond shape you made last is all valley folds but the score line in the centre of the diamond is a mountain fold.

The best way is see how this works to watch a YouTube video on a diamond fold card. It folds together like origami that you did as a kid.

I then cut panels and decorated it using the Timeless Tulip stamp set.

You can also put a white panel on the back to write your message.

Forever Blossoms Sympathy card

Sympathy card using the Forever Blossoms bundle and Ornate Frames dies. I used Blushing Bride and Rocco Rose cardstock and I wanted to match the colour of my flower blossoms to the Blushing Bride card. However as some of you may know,  Stampin’ Up! doesn’t have Blushing Bride Blends so I ended up combining Light Daffodil Delight and Light Flirty Flamingo. I was really happy with the results.

Other products used were Seaside Notions stamp set for the sentiment and a strip of Flowers for every season DSP.

Here’s a close up of the blossoms and you can see a little of the two colours I used overlapping. I also used dark Rocco Rose for the flower centres and Just Jade for the leaves.

I love hearing your feedback so please leave a comment and tell me what you think. Have you ever combined your Blends? And if so what colours did you use?

Handsomely Suited St. Patrick’s Day Card

I am so happy with how this turned out. I wanted to send a card of encouragement to my Irish son-in-law on St. Patrick’s Day and I came across a card by Maria G designs. I used that as my inspiration but changed it up a little and used all our Stampin’ Up! products.

Don’t you just love the waistcoat! Papers used are Old Olive, Granny Apple Green, Petal Pink and Smokey Slate and Basic Gray card.

DSP is Peony Garden and Artistry Blooms.

Stamp is from the Itty Bitty Greetings stamp set

To buy any of these products (NZ only), please visit my online store… rhondafawcett.stampinup.net