Free as a Bird

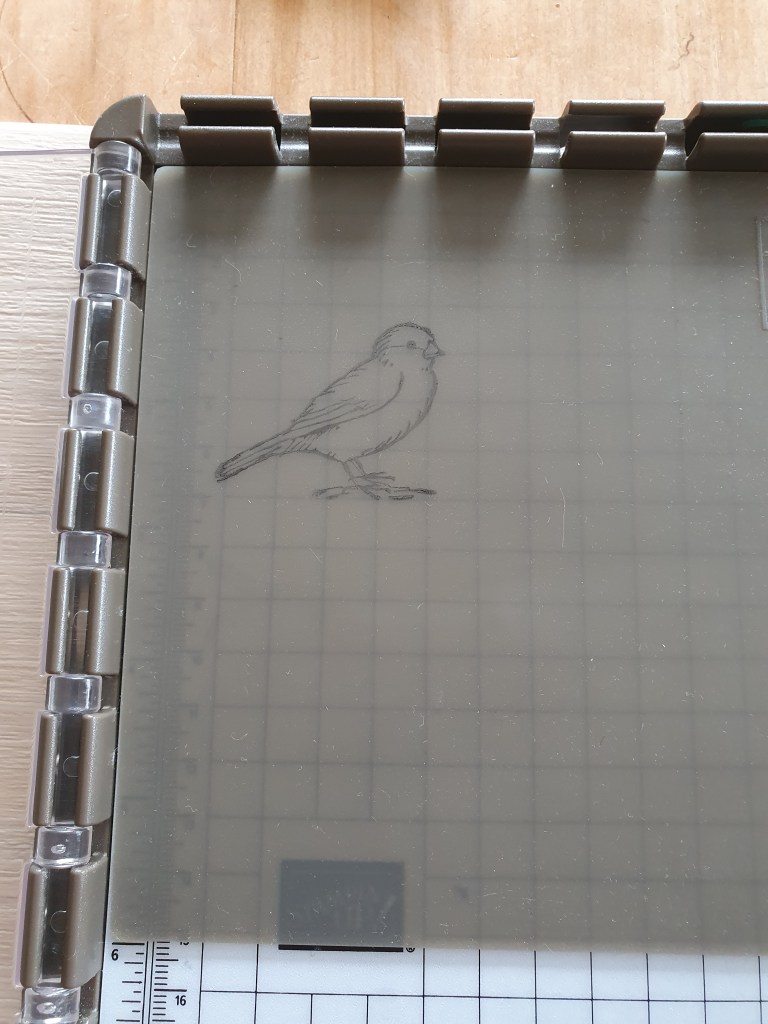
I was showing some of my lovely crafting ladies a little while ago how to get the most out of their stamparatus and I showed them this technique called Mirror image stamping.

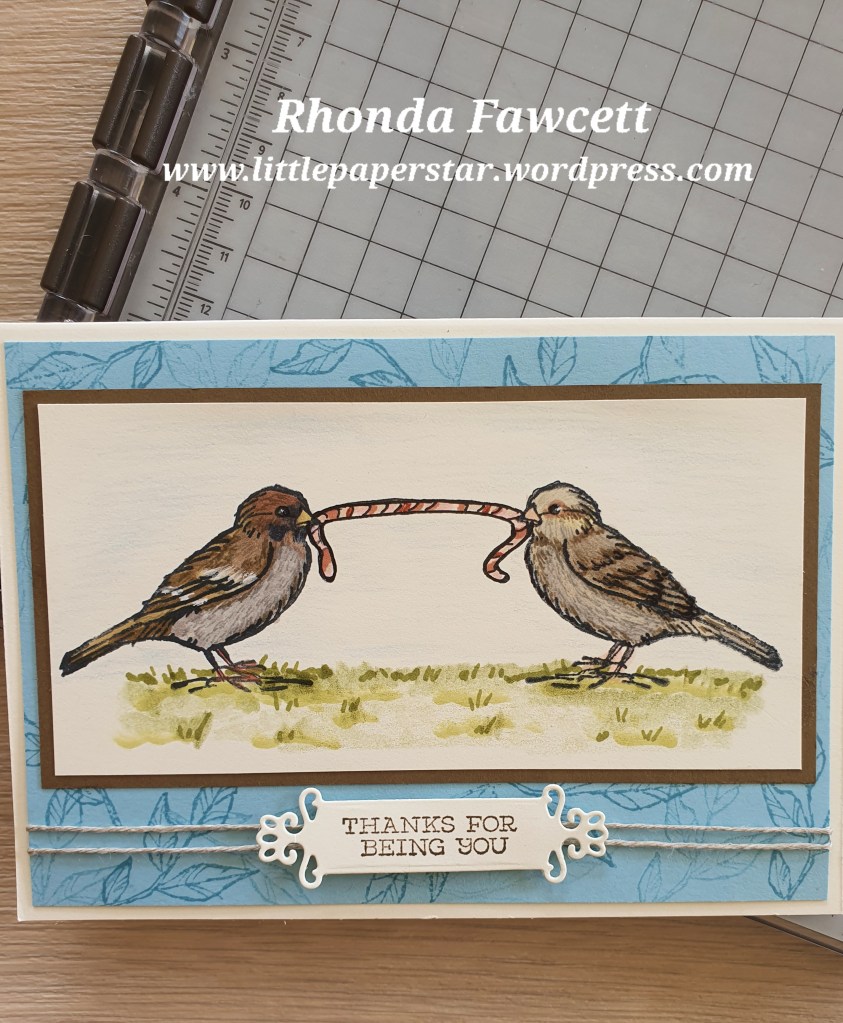
You do need a stamparatus to achieve it and also a silicon mat. You place the bird stamp on your stamparatus plate and stamp the first bird on a silicon mat. Place your card face down on the silicon mat and press with stamp to transfer image from silicon mat onto your card. Turn card over to see transfered image. You can then stamp the second bird onto your card, next to the transferred mirror image bird.

To watch a short video. Click here…https://youtu.be/bc7eD1dtzMs

I decided to colour these birds to look like common garden sparrows sharing a worm. Only after I had finished the card, did I learn that sparrows don’t normally eat worms!

Summer Sketch Challenge

To get creative juices flowing for 2022, I decided to join a card challenge or two. I entered the TGIF sketch challenge # 351. You can see the sketch below.

I also entered the Just Add Ink challenge which is all about summer. I had in mind before I started, to use the “Nuts About Squirrels” stamp set but it was more geared to autumn than summer. So I played around with it, by using a black marker pen to ink just the parts of the stamp that I wanted and I drew in the rest. Now instead of a squirrel with an acorn, I have a mouse with a strawberry.🐭🍓🌞 That says summer right?

The products used are Nuts About Squirrels stamp set, Sweet Strawberry stamp set, Pattern Party DSP, Pretty Flowers embossing folder, Assorted Blends and a Stampin’ Write Marker.

Here is how I inked up the stamp. I used the wide brush end, the side of the brush tip and inked only the parts I wanted. I huffed on the stamp with my breath to moisten the ink as it dries fast and I wanted a nice black image, then I used the journal end of the marker to draw in the finishing touches after I had stamped the image onto Basic White Card.

Who else has done this technique before? I would love to know what stamps you have altered. Please leave a comment and also visit the challenge groups and see if there is a challenge you would like to do next week
https://just-add-ink.blogspot.com/
https://tgifchallenges.blogspot.com/

Memories and More

I have been making the most of my holidays to catch up on scrapbooking. Here are some pages that I have put together. It is super quick using our pocket albums from Stampin’ Up!

The card pack that I have used for fillers is called “What a year”. It comes with 3 sheets of stickers as well as the variety of cards that you can use for journaling, titles or just to add interest by filling in a pocket.

I love the “What a year” card pack because it comes with stickers that allow you to scrapbook a week a year.
What better way to start the new year?
Start scrapbooking your new year now. Include everyday things, like walking the dog, gardening, baking, going out for coffee etc. Use the weekly stickers to highlight each week. There are small arrow label for the odd weeks and larger circles for the even weeks. Stickers for all 52 weeks of the year!

Occasionally when there is not a card suitable to use include in a pocket, I will make my own, using stamps and dies.

Brighten someone’s day with a card

This is our class project this week. I am still trying to decide whether to use a Basic Black card base or Misty Moonlight. Leave a comment with which one you prefer.

I just love this stamp set, Hand-Penned Petals. It is so easy to colour the flowers in as it is a two step stampin set but not one that you have to line up perfectly. It is meant to give a watercolor look, with a swipe of colour on the flowers and leaves. Colours I used were Memento black, Granny Apple Green, Crushed Curry and Misty Moonlight. I used Pumpkin Pie and Poppy Parade markers to colour in the flower centres. The pretty paper is a hostess reward paper and is called Pattern Party.

The paper is embossed with a matching embossing folder which makes the flowers stand out even more. The embossing folder is called Pretty Flowers.

The greeting on this card is from the Dragonfly Garden stamp set. The embellishments are from the Expressions in ink ephemera pack and the twine is from the playful pets ribbon combo.

The inside of the card deliberately has no sentiment, so that you could use this card for a variety of purposes.

Pretty Flowers embossing folder

I had so much fun with my magnolia card that I decided to try it again with a different embossing folder. This time I used the Pretty Flowers embossing folder and coloured in the raised areas with ink and daubers. I used Flirty Flamingo, Granny Apple Green and Fresh Freesia.

The sentiment is from Friends are like seashells bundle and so is the leafy card that is tucked underneath. I included some folded ribbon for more texture and finished it off with a cute little bee embellishment.

Magnolia Card

This card came together quite quickly. I used the magnolia 3D embossing folder then coloured in the raised images with my Blends. I used Granny Apple Green and Old Olive on the leaves and Petal Pink on the flowers. The flower centre was dark So Saffron and Daffodil Delight.

I also used a sponge dauber with Petal Pink ink to rub over the petals to add some softer colour.

The sentiment is from the Sweet Strawberries stamp set. It is die cut with one of the Ornate Frames dies and raised up on dimensionals. I finished the card with some elements from the Expressions in ink ephemera pack; a few sequins and the gold frame.

This really was an easy card to do and it creates a great impact for the small amount of effect required to make it.

I hope you will give it a go!

Christmas Season Home Decor Project

I found all these door hanging signs at a discount store. They had happy Christmas on in Grey felt and were very poorly glued on. I ripped off the felt and made my own decoration using the birch stamp on Soft Seafoam card.

This was one of the projects we made in class this week. We also made a small note card to match.

I stamped the berries in Fresh Fushia ink as I thought they were mistletoe, which is either white or pale pink or mauve. But my husband said they should be red for Christmas and he thought they were holly berries, so I had to make another one for him. 😊

Which colourway do you like best?

The bunches of Christmas leaves, cones and berries are made using the Christmas Season bundle. The words are from the playful alphabet and are cut out using the adhesive foam sheets.

Penguin Playmates

I finally got around to making a this card with the free paper that I got during the recent Stampin’ Up! sale-a-bration. The Paper is called Penguin Playmates and have large images that you can fussy cut out as well as patterned pieces that you can use for the background.

I love this layout from Jacque Williams. Such an easy way to showcase your designer paper. I will definitely be doing more layouts like this.

Have you used your free paper yet? Show me some of your designs.

Colour Charts for Missing Blends Colours

There are 14 colours in our Stampin’ Up! range that do not have a corresponding Blends pen to go with them. I recently needed both Coastal Cabana and Crushed Curry to go with a card I made. It needed to match the DSP also so I decided to try and blend some Blends pens together.

I was pretty happy with the results and would love to share them with you all.

Please email me with Blends chart in the subject bar and I will email you back the charts. (The charts file have all writing printed on, not handwritten as in the photo).

There are a couple of tips that I will email you also.

I am trying hard to direct people to this website so please do not pass on the chart. Instead direct people here so they can request their own.

Many thanks from Rhonda