Sharing my love of all things paper-craft: Card making, Scrapbooking, Gift Boxes, Invitations, Party Favours, Craft Supplies and more. (Formally Stampin'Fantastic)
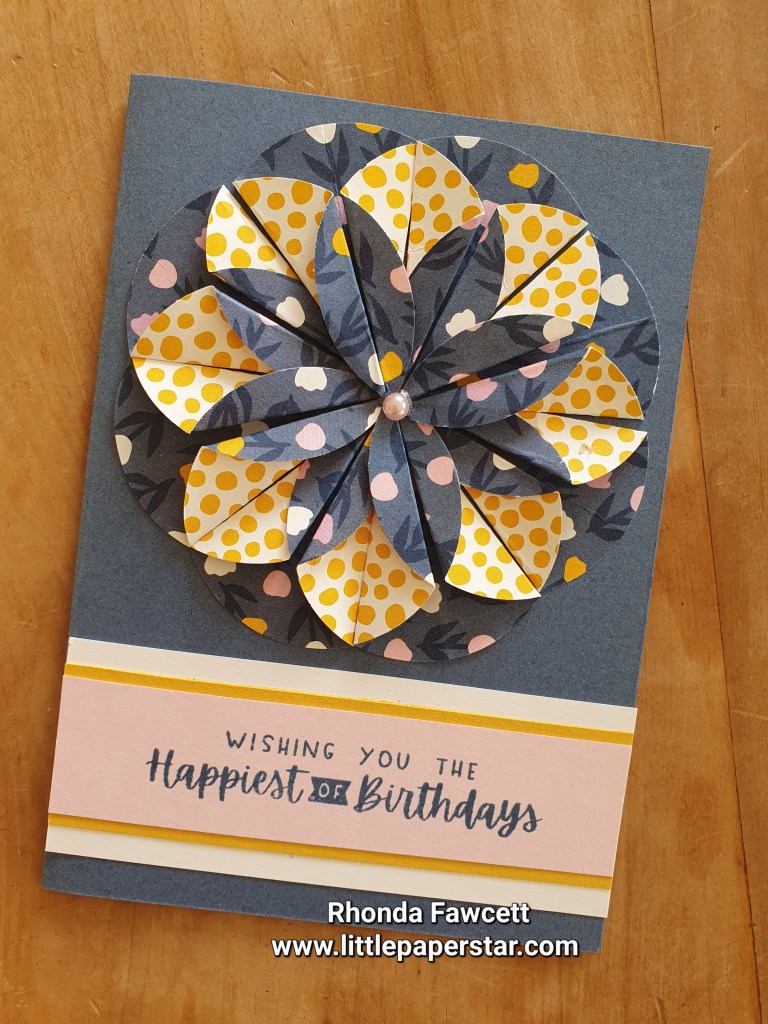
I have seen these Dahlia fold cards around for awhile now but haven’t made one until today. I thought I would teach it at a class, because origami is fun and this card was just a little bit different.
The paper we used is about to retire. It is called Delightfully Eclectic and is currently half price. The stamp set is from the Charming Sentiments stamp set.
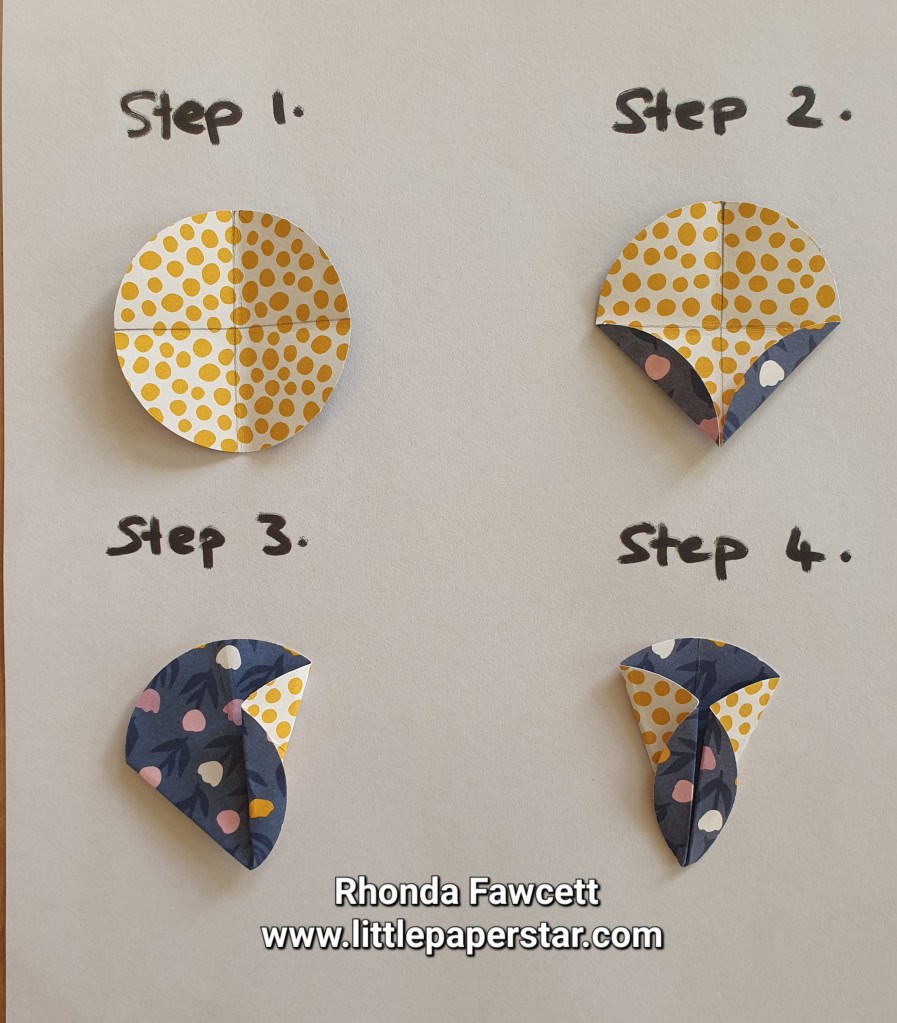
To make the Dahlia, you need to punch 8 circles from the patterned paper and one circle from coloured card. I used a 2″ circle punch. You can see the steps on the photo below.
Step 1. Fold circle in half and in half again. For me it was helpful to draw in fold lines with a pencil as it made them easier to see.. Step 2. Fold in bottom edges, so folded piece is sitting neatly between pencil marks. Step 3. Turn circle over. Now fold in side so it is even with the centre fold. Step 4. Repeat on opposite side. Rub out pencil marks.
You now have 8 Petal pieces. You will adhere these to a card circle. Then adhere onto your card.
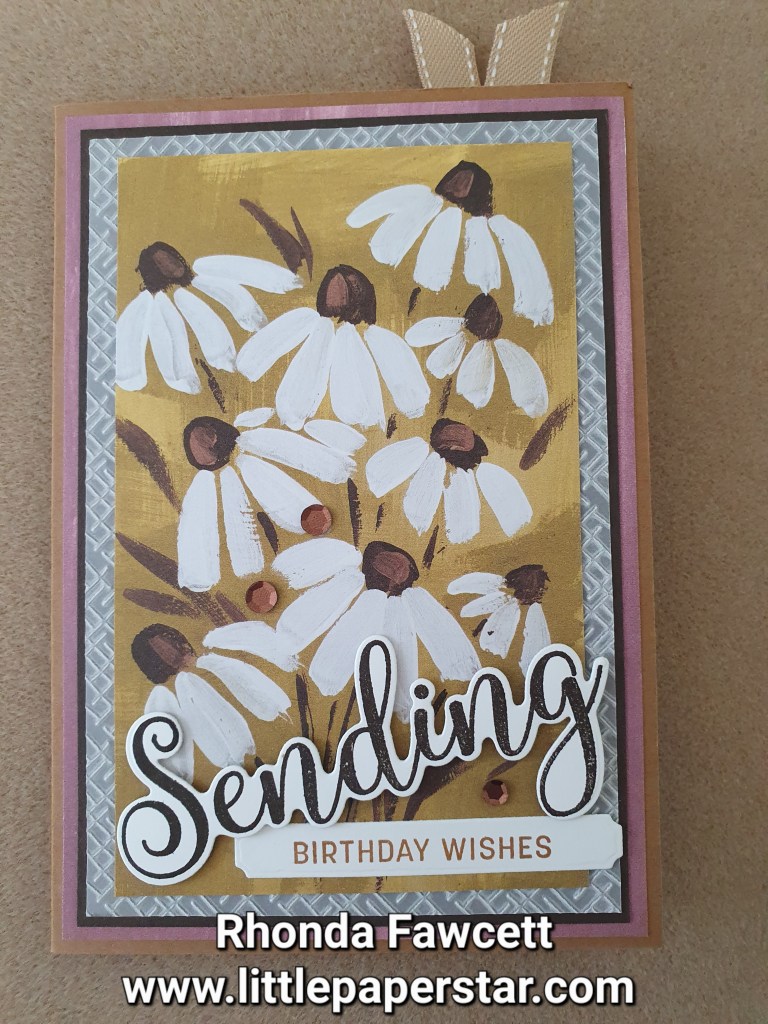
This was a fun card to make. It has a detachable bookmark with it. To make the bookmark, I cut my base card to 14.9 x 26 cm. I used the Take Your Pick tool attachment with the perforating wheel to rule 5 cm off the side. I folded the perforated panel in and folded the card in half. I used the Fresh as a Daisy designer series paper to decorate the front. The sending word and birthday wishes are from the Sending Smiles bundle.
Do you like the white embossed border on the front? It is Vellum. It makes a great border as it is a much softer look than it would have been had I used white cardstock. With such a bust front to this card, I felt it needed something more subtle in the background and the vellum worked perfectly.
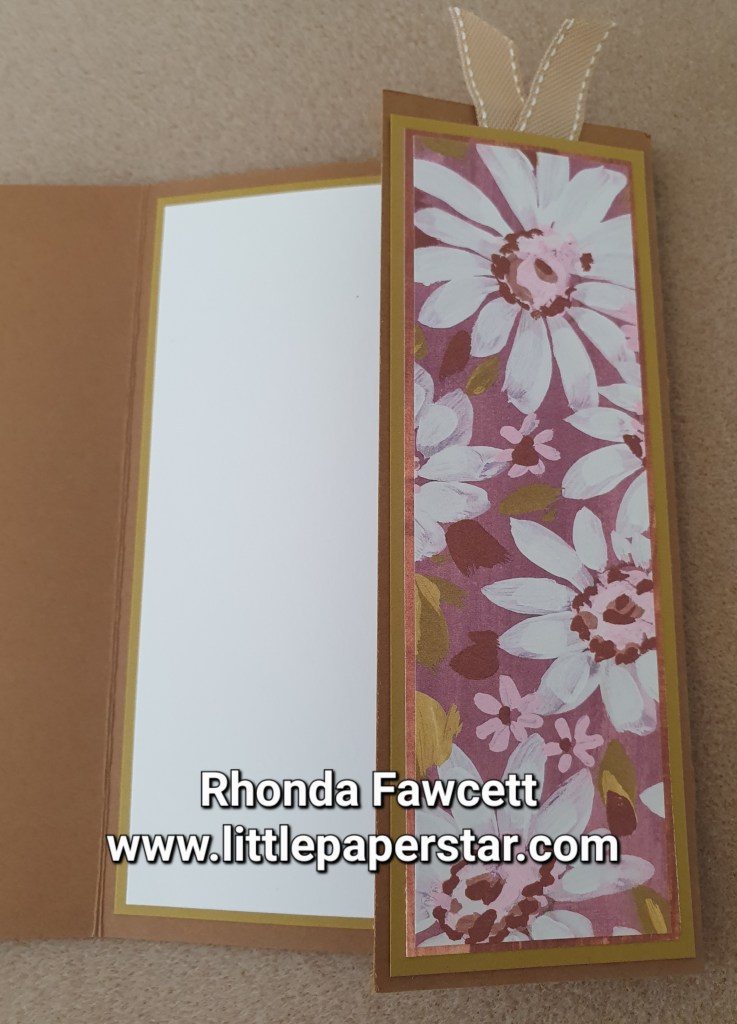
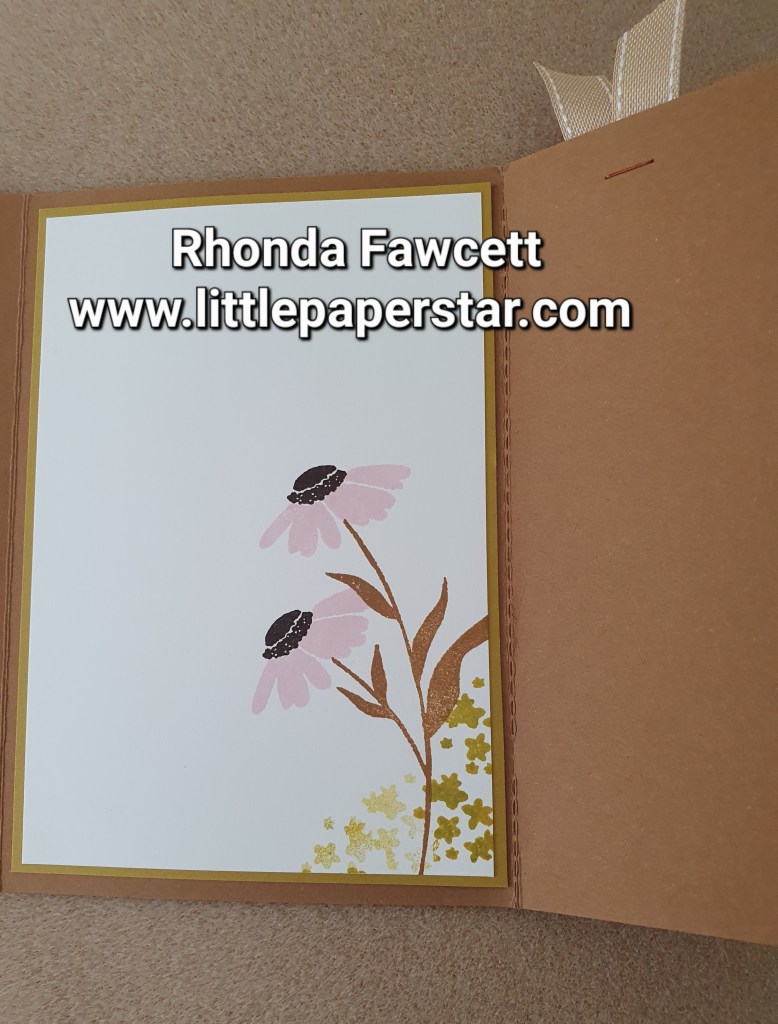
Inside the card, you can see the bookmark, folded inwards. It is decorated with another piece of DSP from the “Fresh As A Daisy” paper pack.
Here is the inside of the card with the bookmark folded out. You will see the perforations that you can tear or cut along to remove the bookmark from the card.
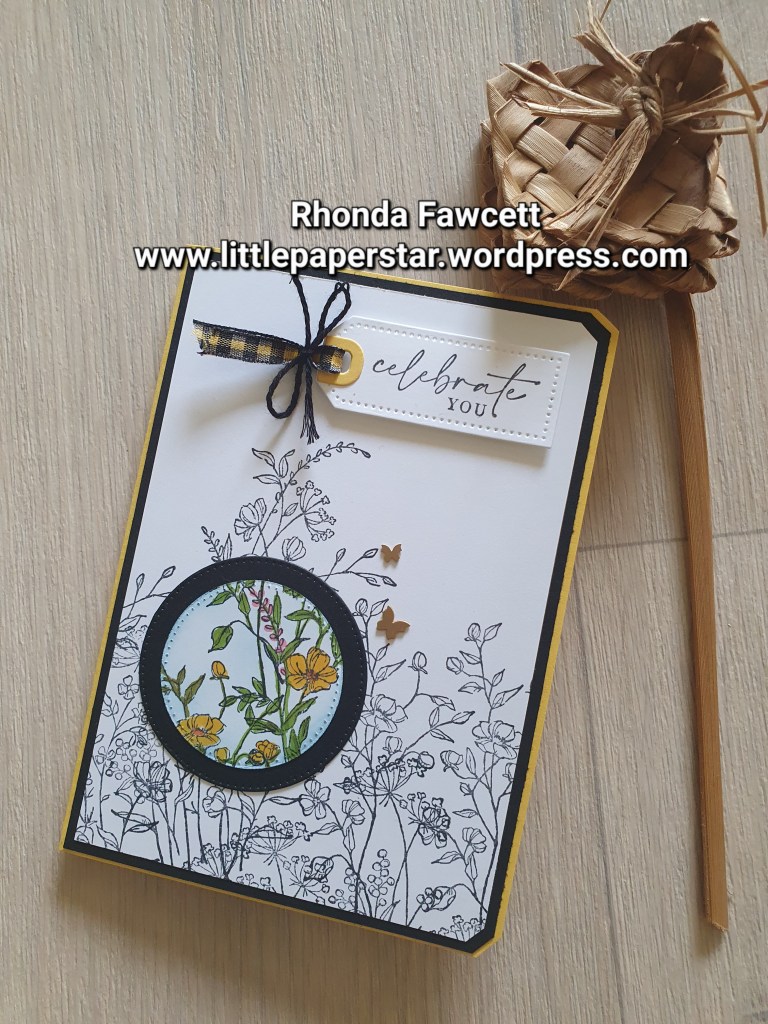
I have been revisiting some old techniques and decided to make a card using the Spotlight technique.
This card uses the Dainty Delight stamp set, the tailor made tags dies and the stylish shapes dies.
I stamped a mix of flower stamps on my white card, then die cut a circle out of the middle. I coloured the circle with Blends and also added a bit of blue with a blending brush. I matted the circle on a larger one diecut from black card. Finally I glued it back in place to cover the hole it originally came from. By leaving the rest of the card in black and white, this brings the spotlight to just the coloured circle piece. I think it is quite effective despite being a simple card to make.
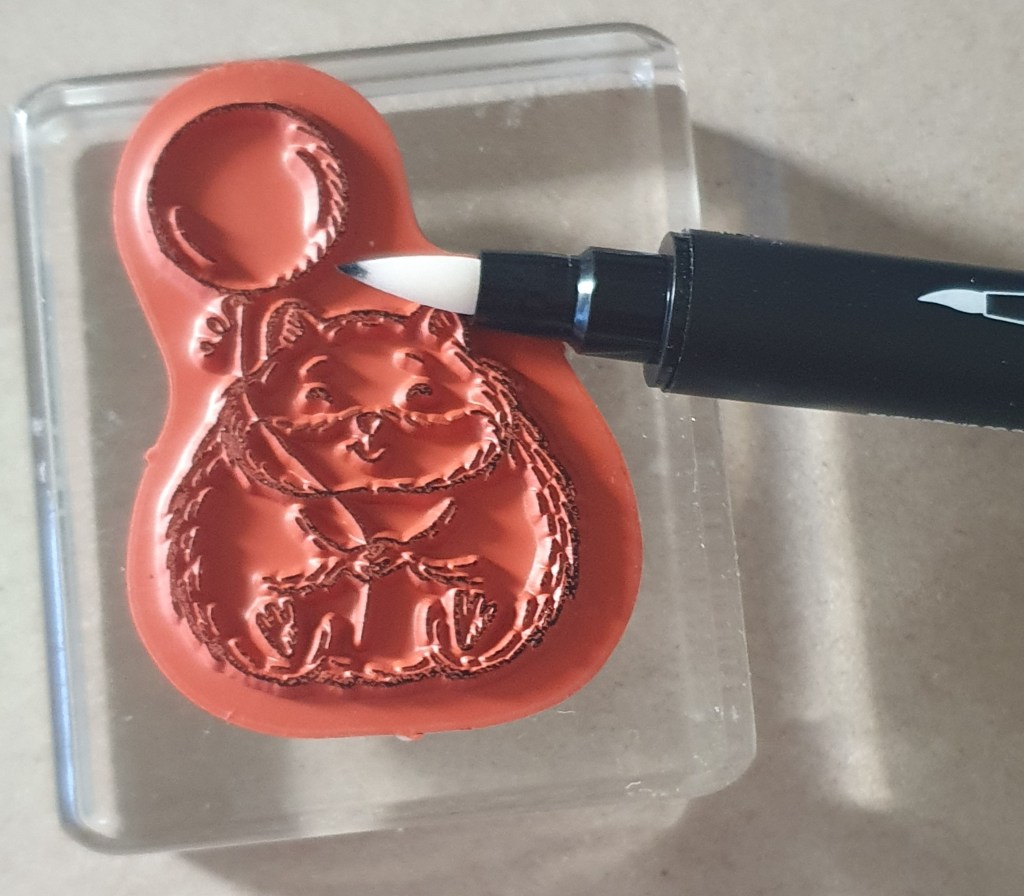
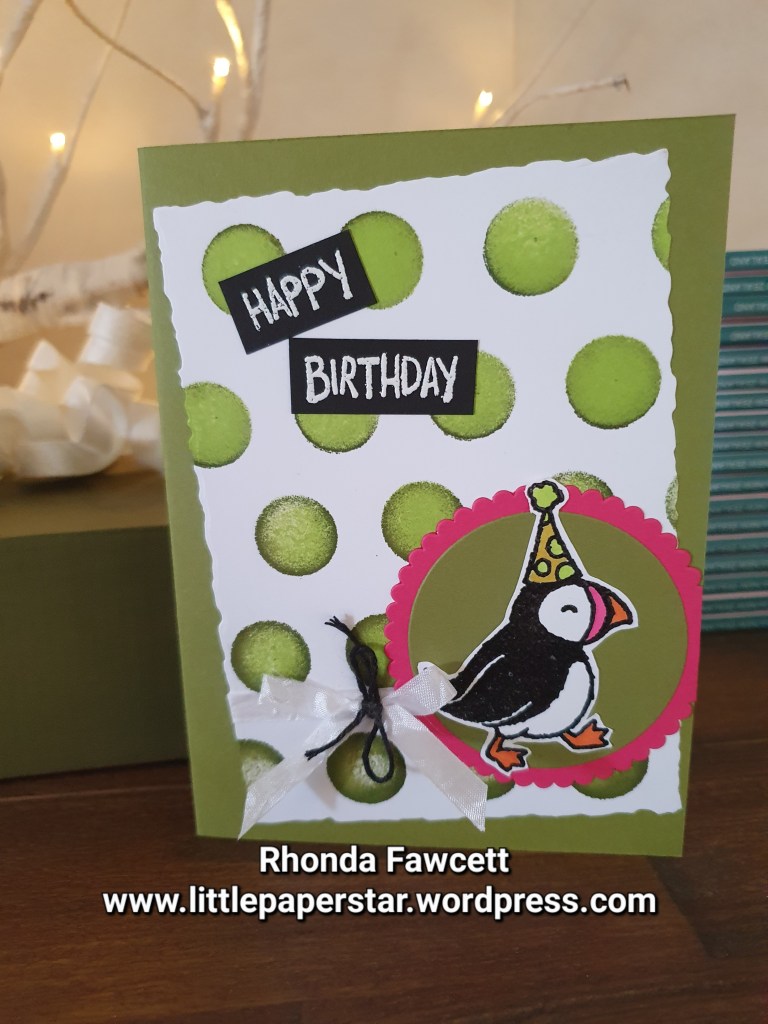
I love the cute animal stamp set, Fluffiest Friends You may not have noticed this set before as it is not in any printed catalogues. Instead it is available exclusively as an online offering from Stampin’ Up!
.I decided to do a card with a cat for my granddaughter and I thought that the little hamster also would make a great cat.
First I inked up the hamster stamp, then I used a blender pen to remove the ink from the hamster’s face and paws. If you are going to try this technique make sure you take a few goes at removing the ink from each part, wiping the blender pen clean between each go, to ensure you remove all traces of ink from the portion of stamp where you want it gone.
Because this took more than a few seconds and the ink may have dried on the stamp, I huffed on it, to moisten the ink with my breath. Then I stamped the image. I used a black stampin write marker to add in the face and whiskers to match the larger cat. I added cat paws and a tail.
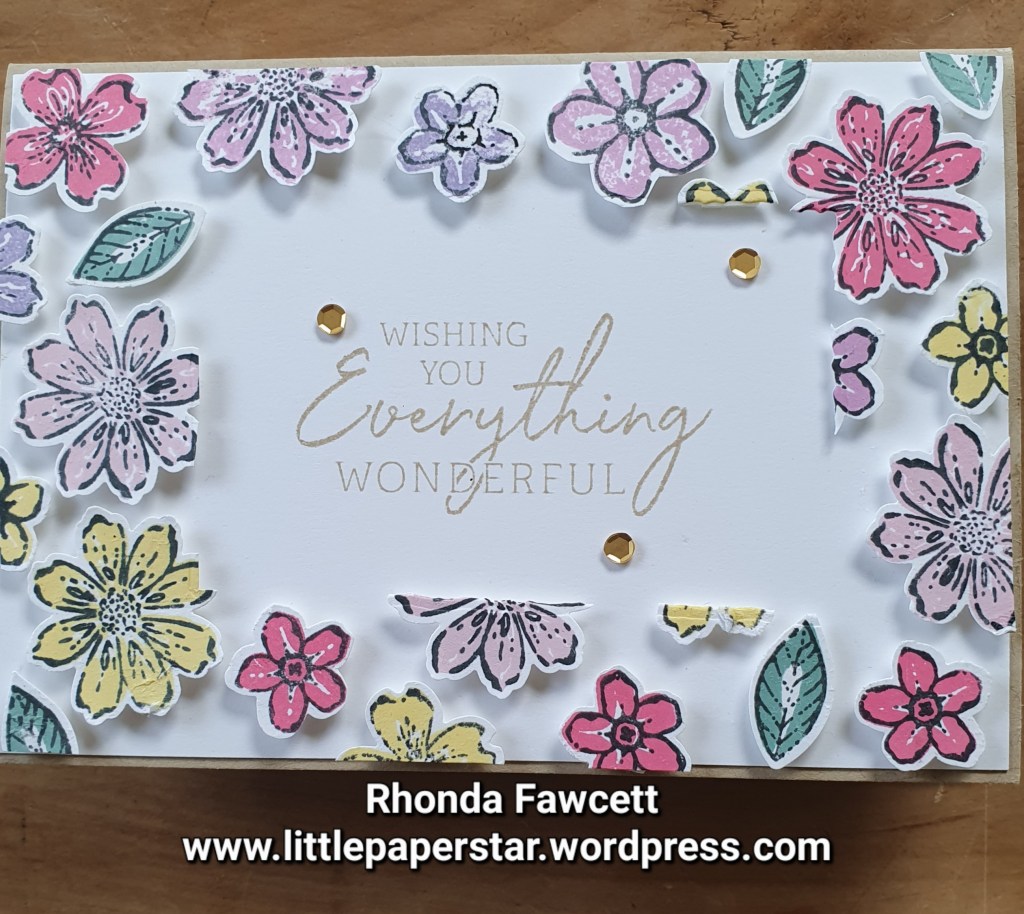
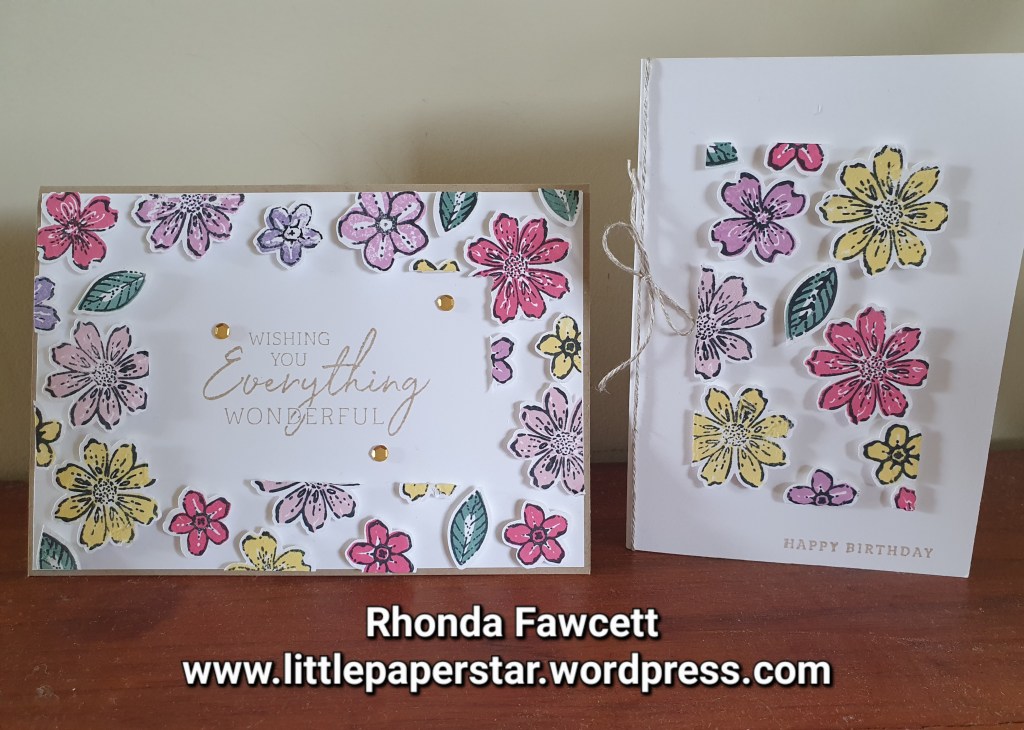
This week I have been making Floating Frame cards. To make these cards you lay out lots of little stamped and punched images like these flowers from the Petal Park bundle. I used Press and Seal cling wrap from GLAD ®️.It holds all the pieces in place while you cut out the frame. Then you need to adhere foam dimensionals to the back of each piece before adhering to your card.
Keep reading for step by step instructions on how to do this technique.
I kept the inside of my card fairly plain. That way i coukd use it for a variety of occasions.
This technique creates two cards, one with the frame and the other using the rectangle that you removed to make the frame.
I used one of the small notecards and envelopes for the centre floating panel. It was the perfect size.
INSTRUCTIONS
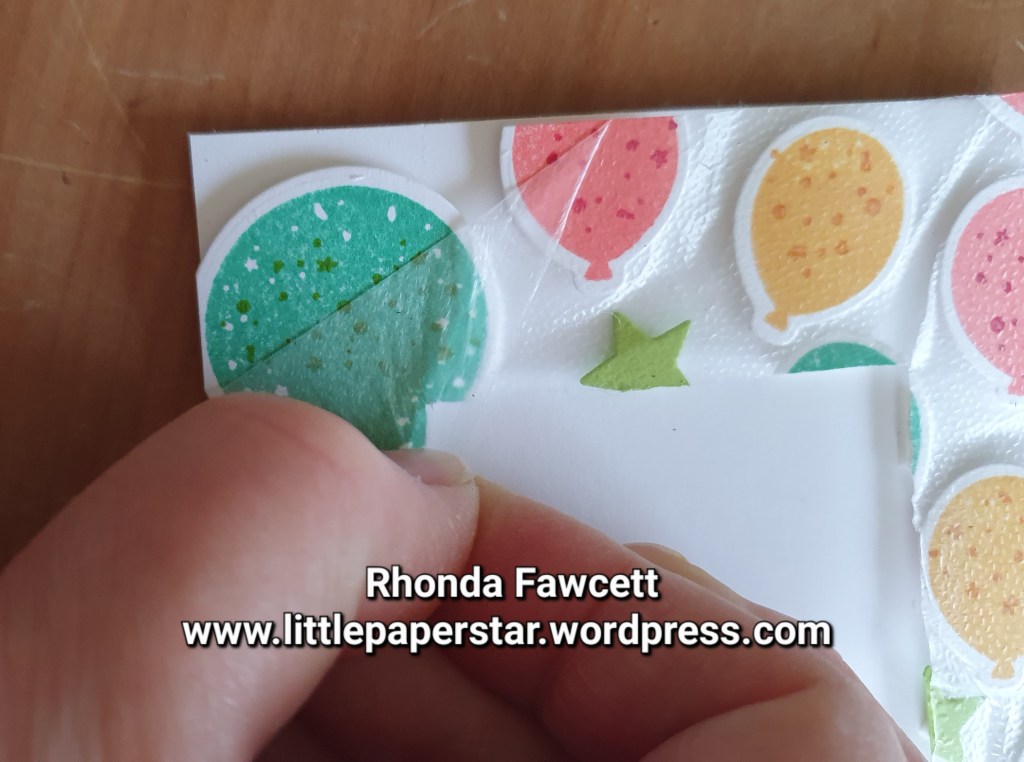
Cut, punch or diecut all the pieces you want for your card and lay them on top of a 14.9 x 10 cm white card base. Do not adhere, just lay in place. Then cover with some Press ‘n Seal cling film from GLAD ®️. Sticky side down. This will hold everything in position while you cut out the centre rectangle. I used the deckled rectangle dies from Stampin’ Up!
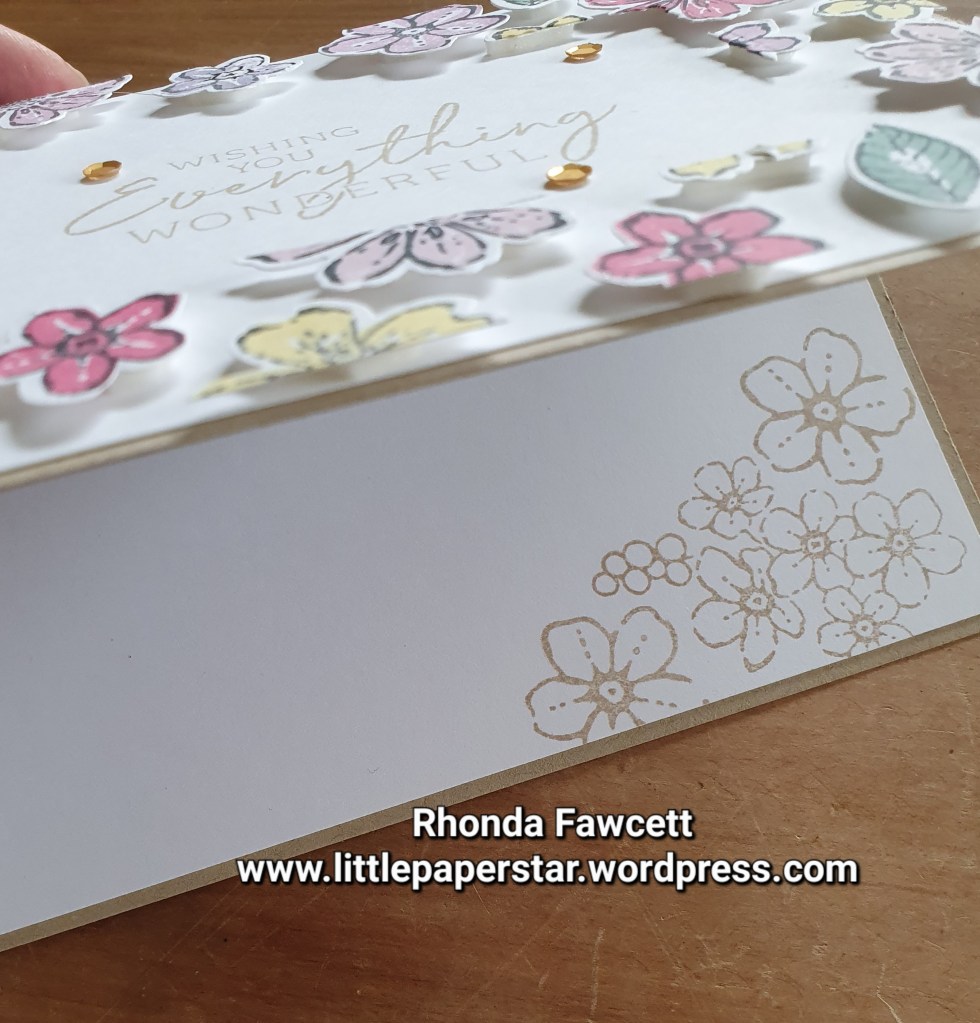
Remove the centre rectangle and trim the cling film to edge of card. Including any pieces hanging over the edge of the card.
Turn over. If there are pieces that are too small to put foam dimensionals on, like the ones pointed to, in above photo, remove them. They will peel off with a bit of help. You can shift any pieces if you notice gaps, or add more in, like I did. (See next photo). The important thing is not to have any pieces overlapping.
Now add dimensionals. Cut some dimensionals in half or use the edge of the foam to get the right size for all the pieces.
Peel off all the backing from the dimensionals. This is a bit fiddly as everything is sticky.
Then adhere frame on to another piece of 14.9 x 10 cm piece of white card. I started in one corner and then tried to line up the other corners as I adhered it all in place.
Make sure all the pieces are stuck down, the slowly and carefully peel off the cling film. If you are not slow, it will rip and lift off some colour from your stamped images. If this happens, go back afterwards with a blender pen and draw in some more colour.
Throw away cling film. Stamp in the centre of your frame.
Don’t forget to stamp inside your card as well.
Repeat the process with the rectangle that you removed at the beginning. Adhere dimensionals to the back of all the pieces on the rectangle shape. Then adhere to a small gift card base. Peel off cling film. Add a sentiment and stamp a couple of small balloons inside.
Earlier this year, Stampin’ Up! brought out a layering stencil called Loveliest Layers Decorative Mask. It is a fun stencil to use as it creates a big flower using four different layers of stencils. (Two for the flower and two for the leaves).
There is also a lovely patterned stencil to make backgrounds with. I used it for the top of my card.
I made a big square card (13.4 cm square) as it was a good size to show of the flower. I used Polished Pink and Melon Mango inks and a blending brush to add ink
The inside of the card has a strip of patterned called Pattern Party Designer series paper. It was from a pack that I bought last year.
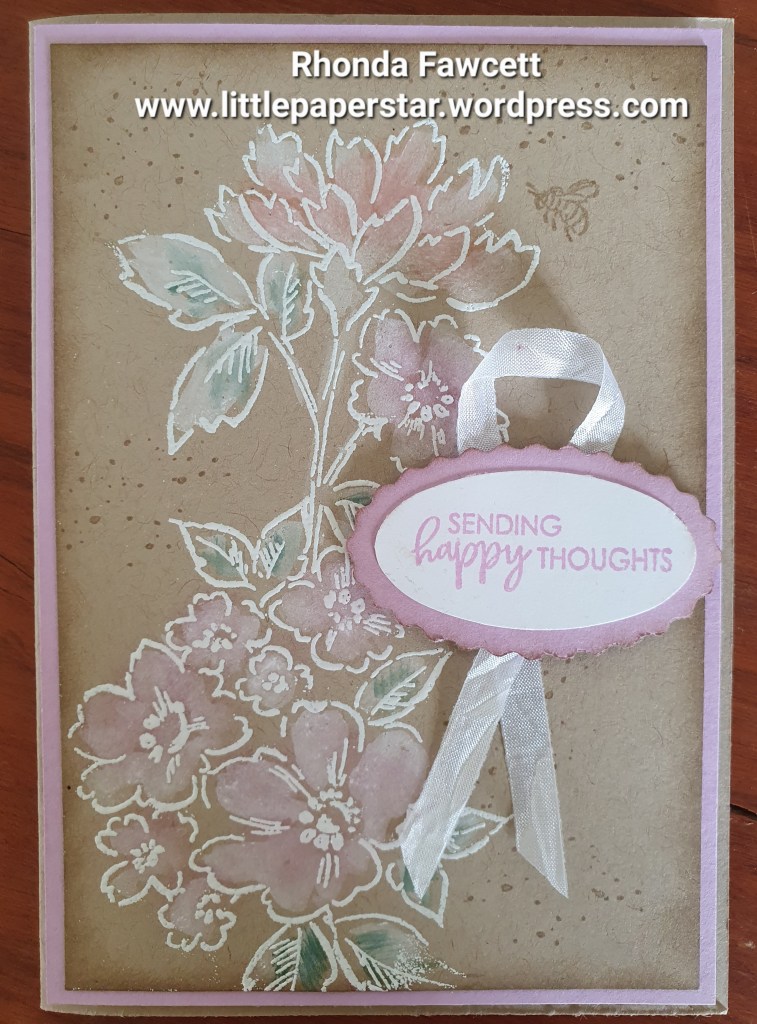
This is a fun technique to add colour to a Crumb Cake (or other colours) card base.
I embossed the flowers from the Hand Penned Petals stamp set with white embossing powder. Then I coloured the Petals and leaves in with white ink. I used a craft white ink refill and an aqua painter. When this had dried, it only takes a couple of minutes, I daubered on some colour. I wanted my card to have a vintage feel so I only used soft, pastel colours and applied the colour lightly. But you can go quite dark with this technique if you want to.
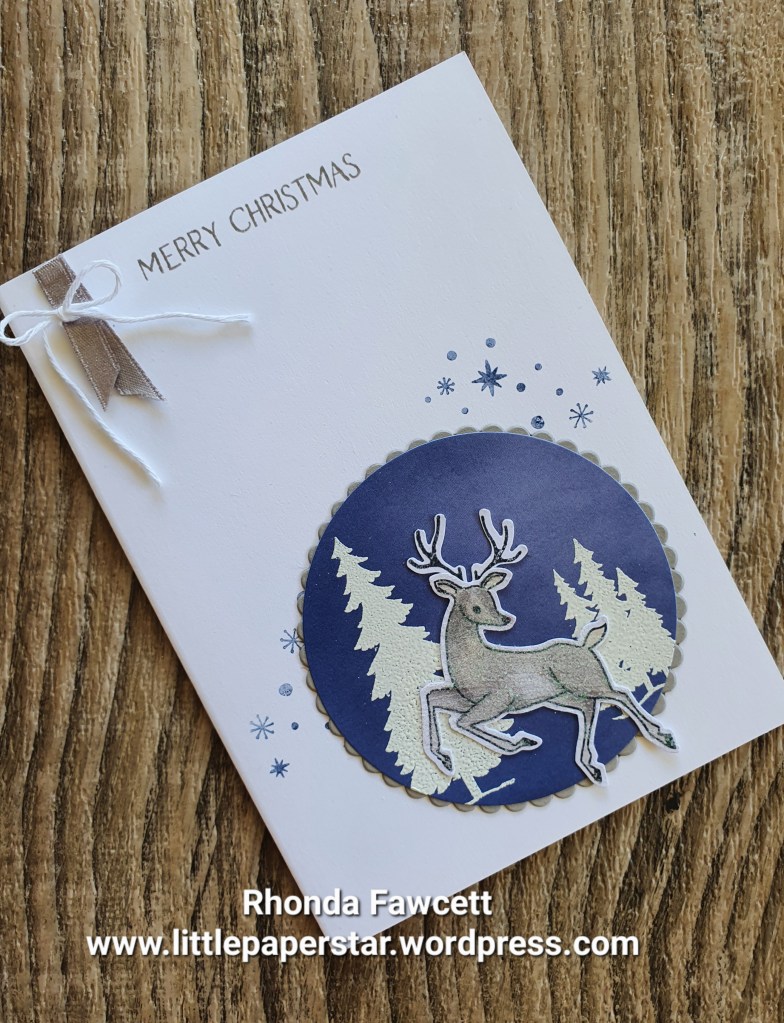
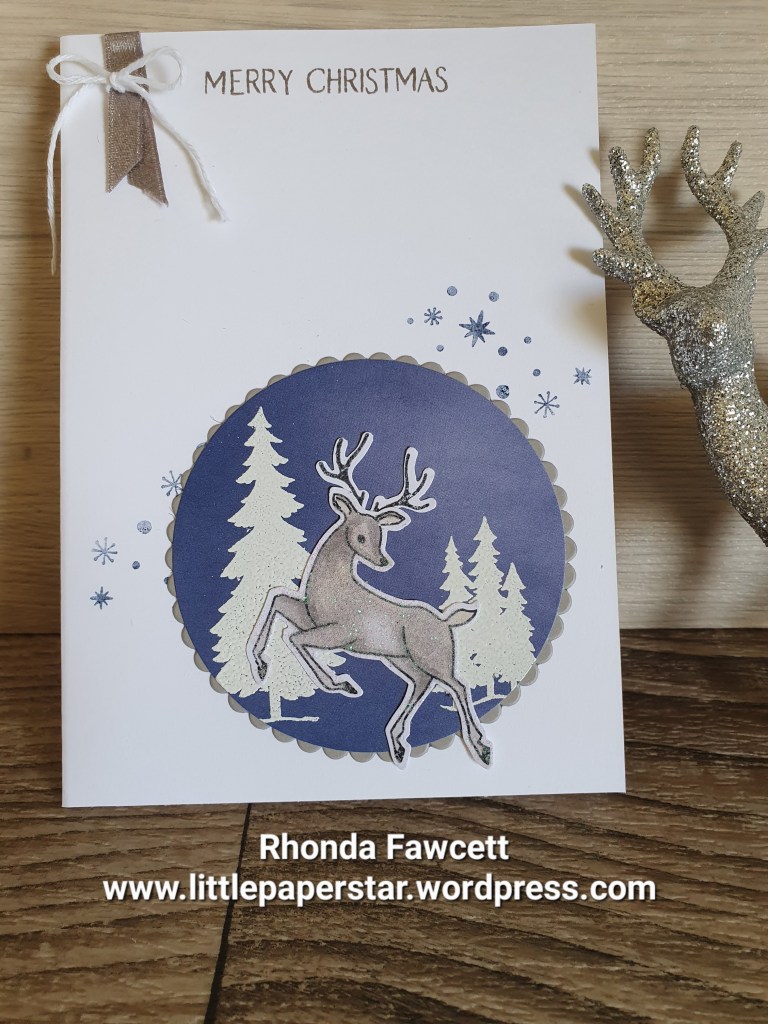
I taught a card in class recently using shimmer embossing paste over the top of the stamped and coloured image to add some sparkle. I decided to try it again on this Christmas card. This is also my entry for the Just Add Ink Challenge #JAI632 The challenge was to choose two items from the list of Deers, Trees, Sparkle. I chose Deer and Sparkle but there are trees in it as well. Bonus!
You only need a thin very layer of paste. You need to colour your image with Blends. I haven’t tried it with an image coloured with ink but I imagine the ink would run a little with the moisture from the embossing paste when you first spread it on.
If you live in New Zealand and want to recreate this card, you can order all the products from my online store rhondafawcett.stampinup.net
For this project, I used sunprints DSP for the blue circle. I stamped the trees from the Peaceful Deer stamp set in versamark and heat embossed with white embossing powder. I stamped the Deer in black memento ink and coloured it with Gray Granite Blends and a light Crumb Cake Blend. I then added a thin layer of shimmer embossing paste. Once paste was dry I punched it out and added it to the blue circle. I matted the blue circle onto a die cut Gray Granite scallop circle. (Layering Circle dies). I stamped the snowflakes in Navy ink. (Second generation to give a softer look to match the lighter blue on my paper). I adhered this to the bottom right corner of my thick white card base. I stamped a sentiment at the top with Gray Granite ink and finished the card with a strip of Gray Granite shimmer ribbon.
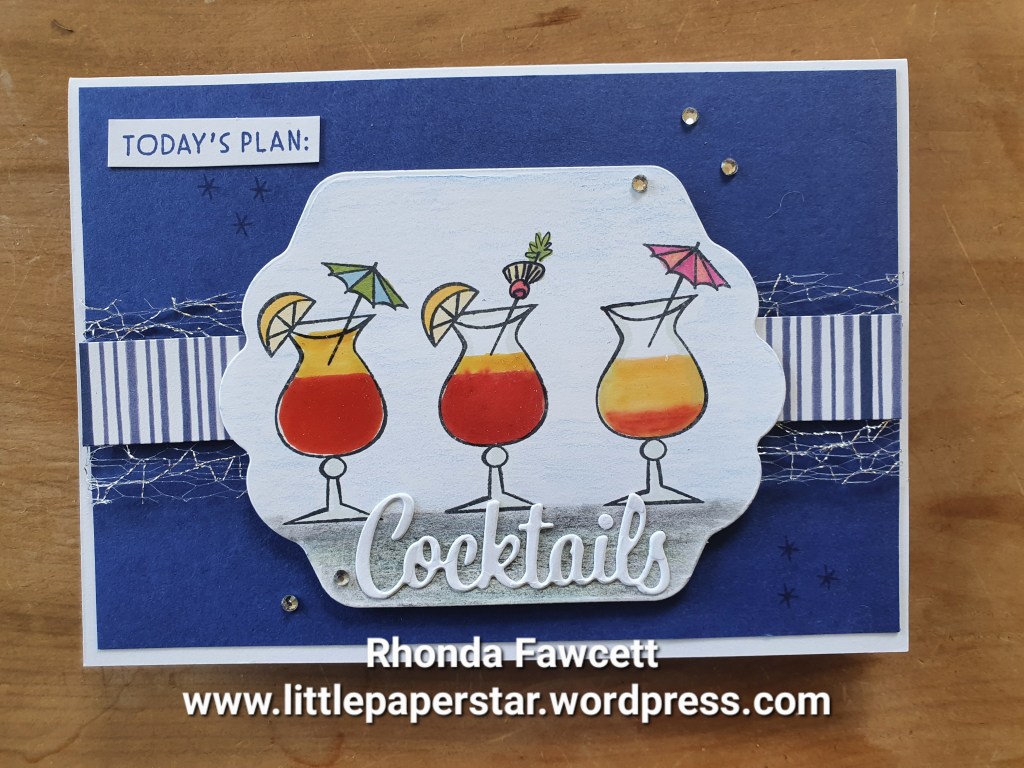
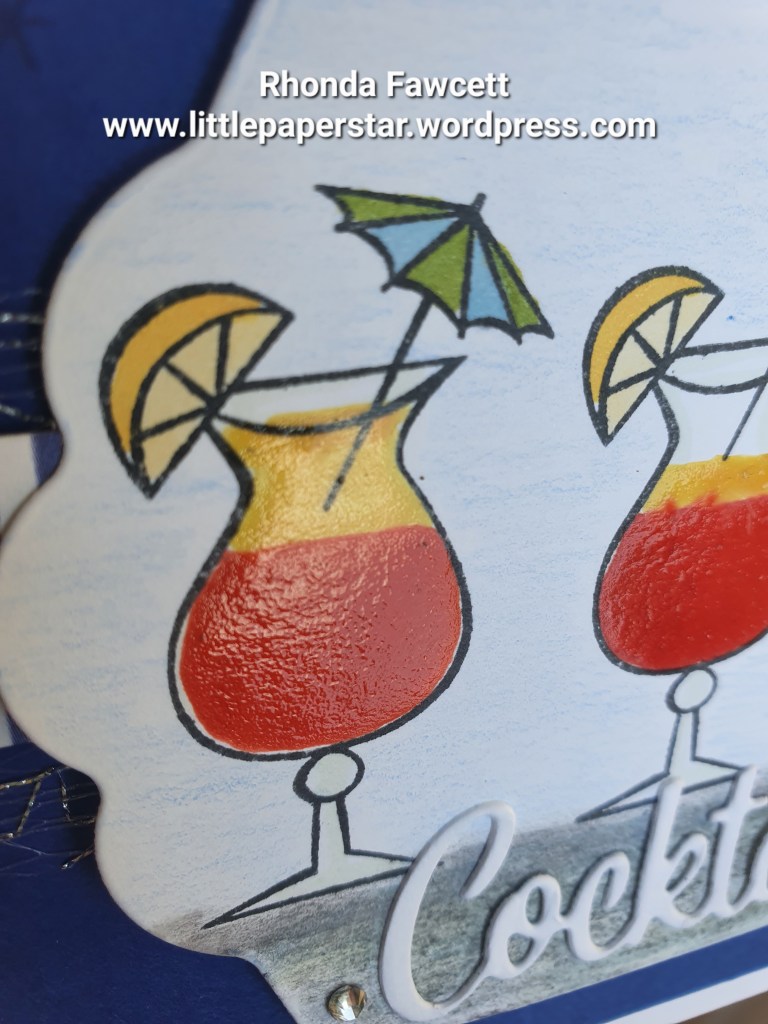
I made this card to showcase a painting technique using the fine tip glue and our Stampin’ Up! reinkers.
It also uses the Nothing is Better Than stamp set. I stamped the cocktail glasses in Memento black ink and then mixed up a mixture of fine tip glue with a drop of ink colour to colour the cocktail glasses.
I used an old jar lid to mix up the colour and then painted it inside the stamped area. The glue dries fairly quickly, maybe in fifteen minutes or less depending how thick you paint it on. Once it is dry, it leaves a glossy, raised look behind.
Pretty easy to do and it is always fun trying out something new.