Sharing my love of all things paper-craft: Card making, Scrapbooking, Gift Boxes, Invitations, Party Favours, Craft Supplies and more. (Formally Stampin'Fantastic)
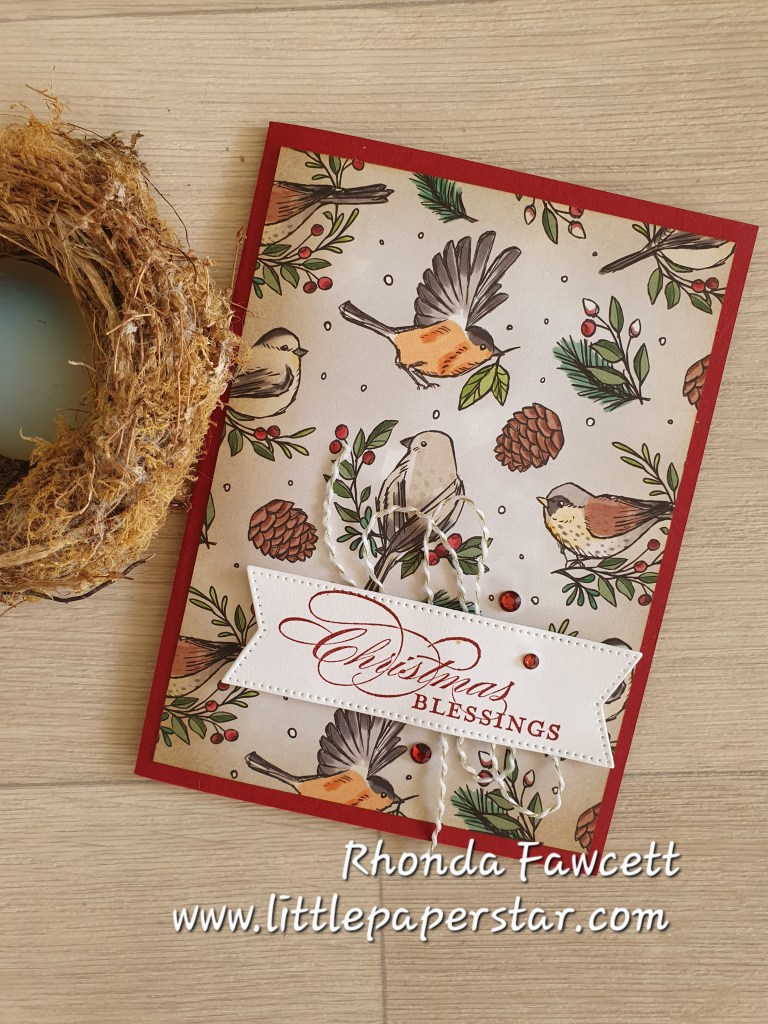
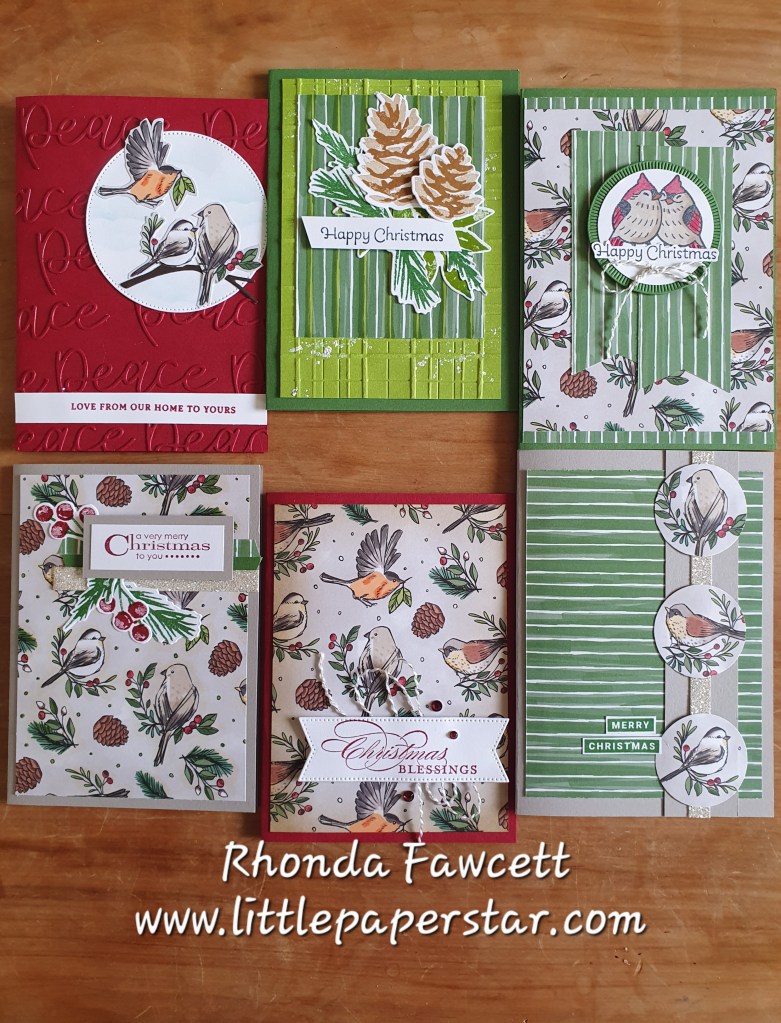
I recently participated in a demonstrator online event which showed us how to get the most out of one sheet of Designer Series Paper. (DSP). We made 6 cards, all using different techniques and using sketches from page 52 of the new Christmas mini catalogue.
We cut our DSP into the separate sections that we needed for each card, then using different colouring and cutting techniques we made our 6 basic cards. Once we completed the 6 templates we went back and added sentiments and embellishments.
For this card, I used a retired Christmas greeting and cut it out with a Stylish Shape die. I matted it on top of the new gold and white twine.
The technique used here is sponging ink over the DSP for a different look. I chose to just sponge the edges with Crumb Cake ink. It gave a antique look for this card which I really loved.
Here are the rest of the cards I made using the sketch guide and techniques on page 52. If you want to learn what I did, follow me on Friday the 3rd of October where I will be doing a Facebook live demonstration of this One Sheet Wonder.
I love this double z fold card, that was taught to me by Irene Wardlaw at our annual stamp camp earlier this year.
One of the great techniques is the use of the two tone paper. This paper has a white core, which once embossed can be sanded to bring out the textures even more, by revealing the white core.
The birch wood embossing folder was perfect to make waves for this card. Who would have thought a wood grain type of embossing folder would make such effective waves and clouds?
The stamps and dies used are from the Sunrise Sailing bundle. The sailboat dies reminded me of a punch I had a few years ago. The middle Sunrise Sailing die is very similar in size to my old punch. The retired punch is on the left with Basic Beige sails. The current die is on the right with white sails.
Another great thing about this card, is that it can be folded flat for posting.
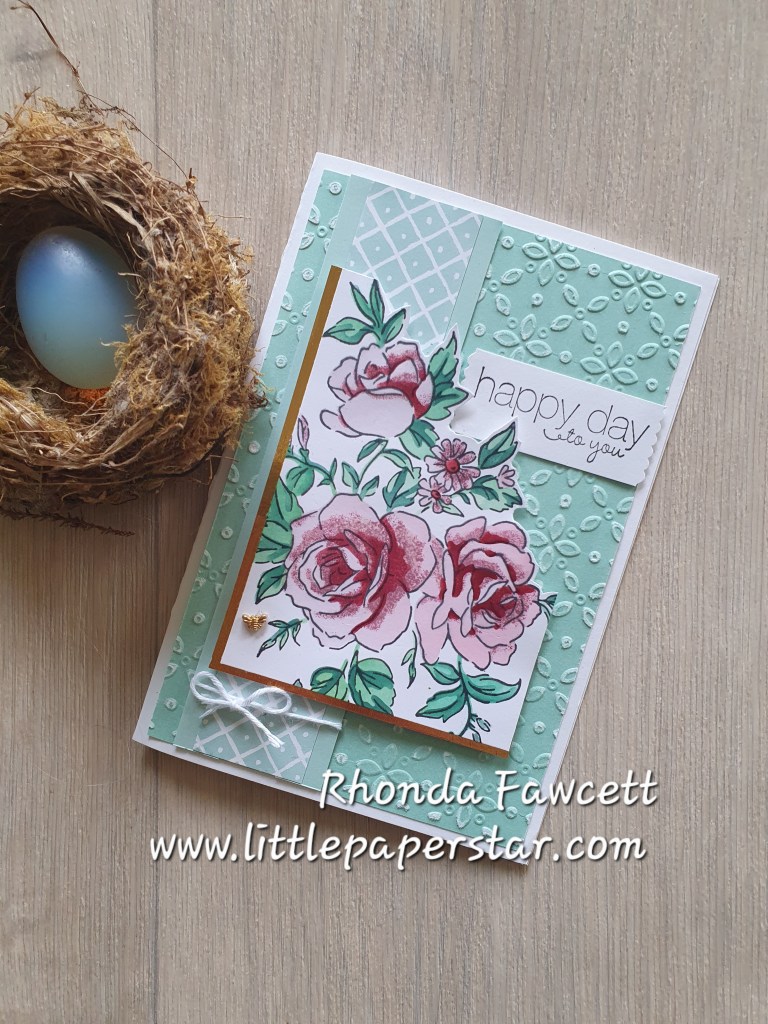
Here’s a card I made at our recent Stamp Camp. It was taught by Leoni Cane. I loved the technique of sanding the two tone paper to further highlight the pretty embossed background.
The stamp is from the Layers of Beauty bundle, which includes decorative masks, (stencils), dies and stamps.
The DSP is from Nests of Winter paper pack. It worked well with the Pool Party two toned paper.
The stencils make colouring the flowers so easy. For the lightest and darkest colours, I used a blending brush. For the middle colour, I used a sponge dauber and dabbed colour on. It gave a more mottled effect, whereas the blending brushes give a very smooth finish.I added Wink of Stella to my flowers for an extra sparkle.
How cute is the little gold bee? A perfect finish to this card.
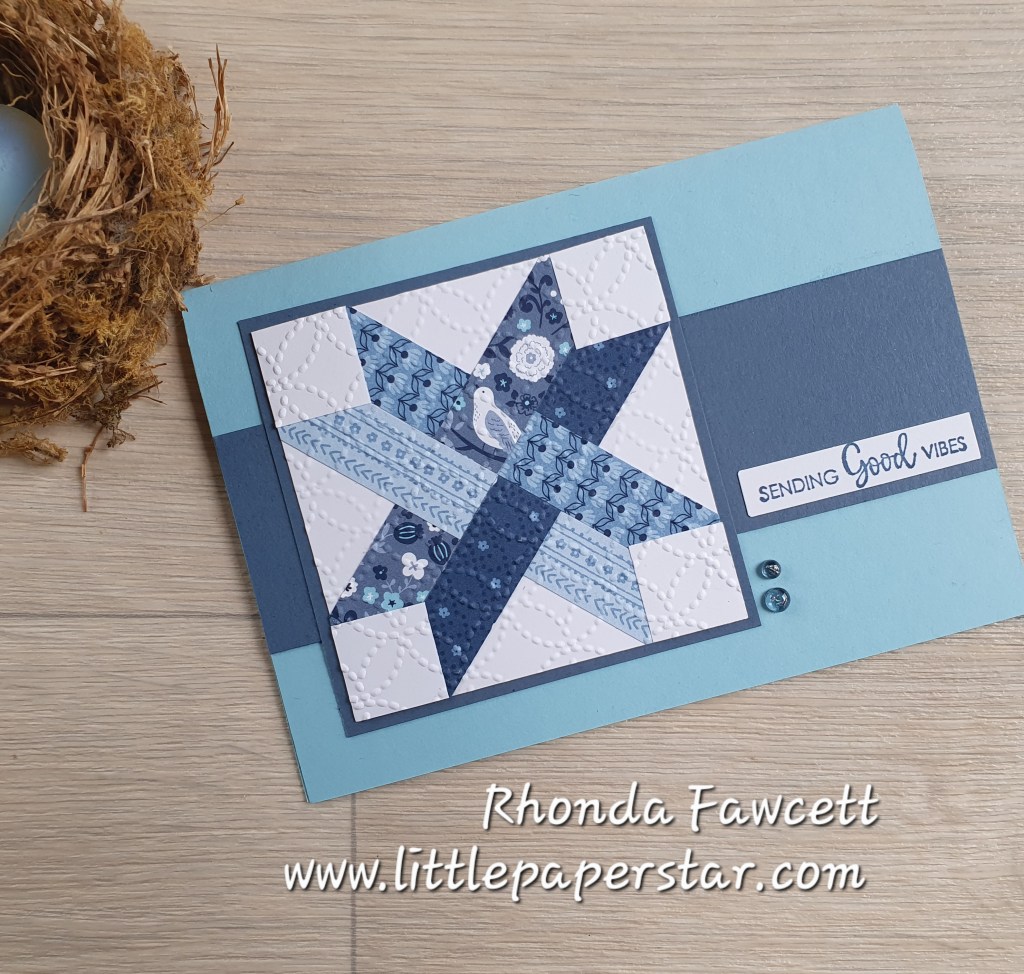
I used the recently retired Countyside Inn papers to make these two quilt look cards. Any patterned paper with a small design print would work well for cards like these.
The first card uses a Balmy Blue base with A Misty Moonlight panel in the centre. Once the strips were glued down on the white square, I put it all through an embossing folder to further enhance the quilting look. The sentiment used on both cards are from The Right Words stamp set.
The second card with the bird on is a book fold card. It is made using small squares and triangles. Colours used are Misty Moonlight and Night of Navy. Again, once the pieces are glued down onto the white card, it is then embossed using the eyelet embossing folder. Both these cards are easy to make and you will find instructions by doing a Google search for Stampin Up Faux Quilt Cards.
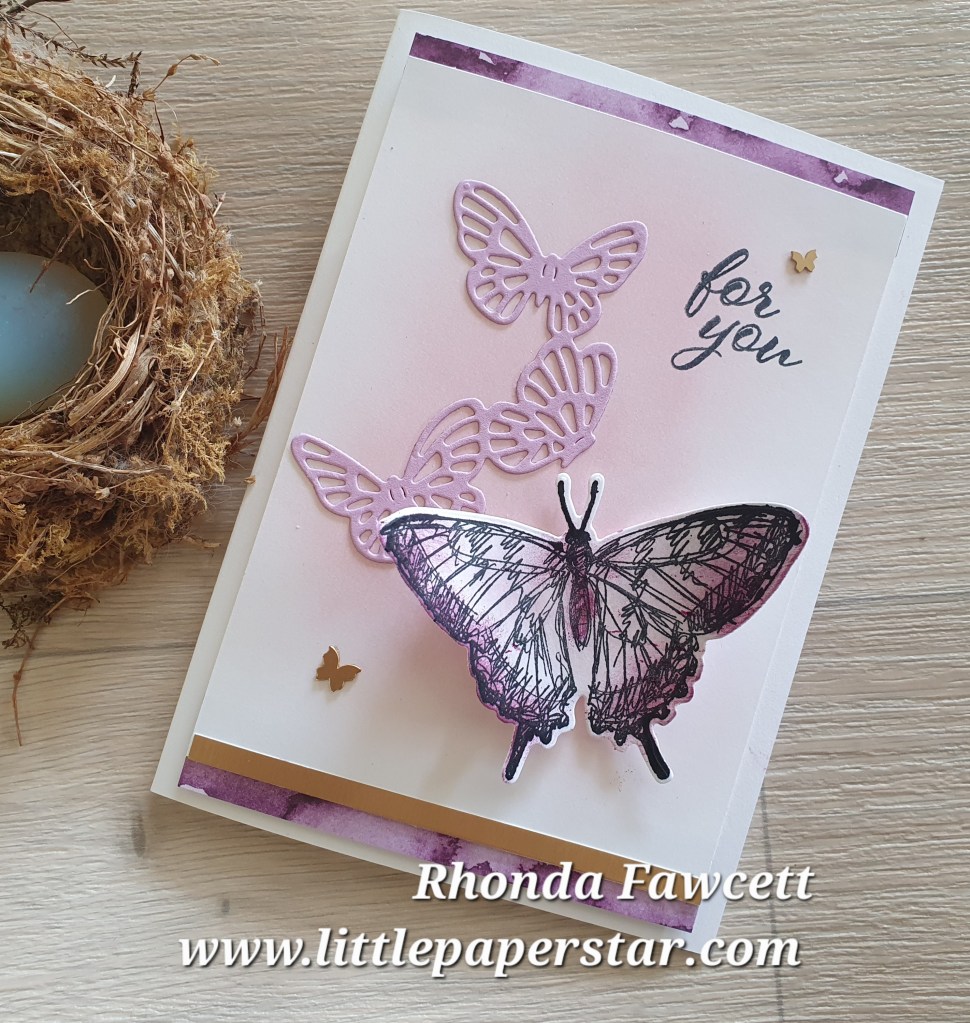
Here’s a recent card that I taught in my classes which is taken from a sketch challenge.
The challenge is to take an idea or sample from the Stampin’ Up! catalogue and use it as inspiration for your card. Here is the idea…
If you visit CASE-ing Tuesday Sketches you will be able to see more and take part in the current challenges.
My finished card was inspired from one made by Jolanda Johnstone. If you visit the CASE-ing Tuesday Sketches you will see her card and find that I have changed mine up quite a bit from her original design. I kept the sponging elements, on the background and butterflies as I thought the casual colouring of the sponging worked well with the sketched look of these stamps. I wouldn’t want to colour these butterflies too precisely and lose that casual sketched look.
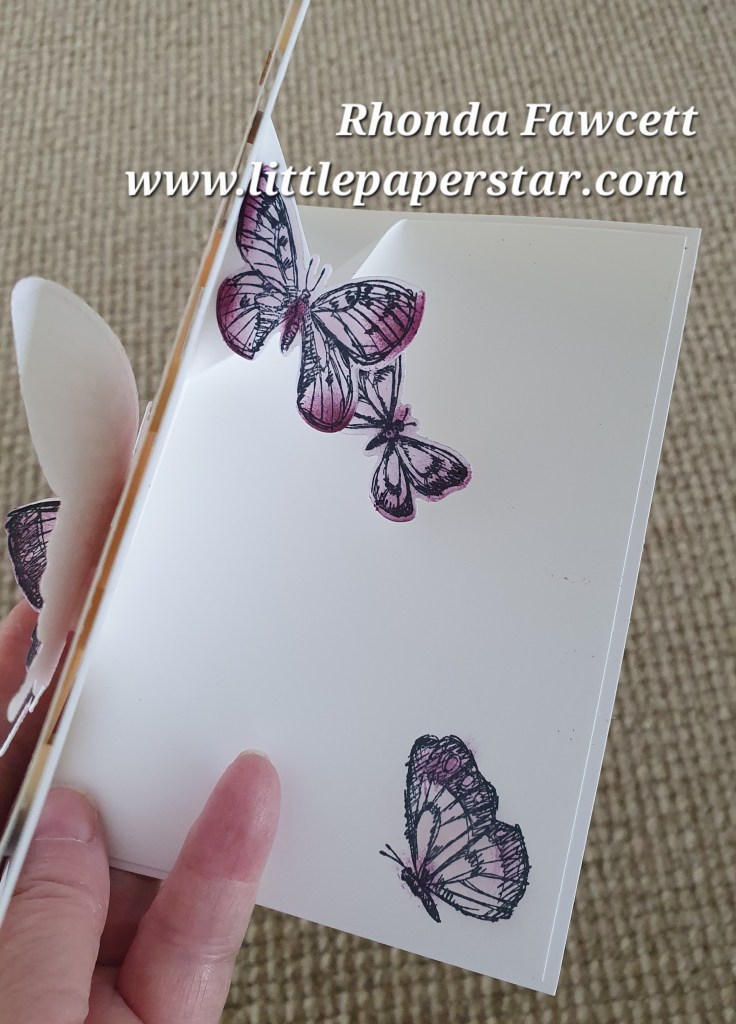
I decided to do something different for the inside of my card and I made a simple pop up card.
This is done on a insert card which is slightly smaller than the base card. I folded my insert card in half and made a pencil mark 4 cm mark on either side of the fold line at the top and another 4.5 cm down on the fold line. Then I scored down both sides to make the angled pop out piece. I added some butterflies to the left hand side. When the card is open the butterflies pop up but they fold back down when the card is closed.
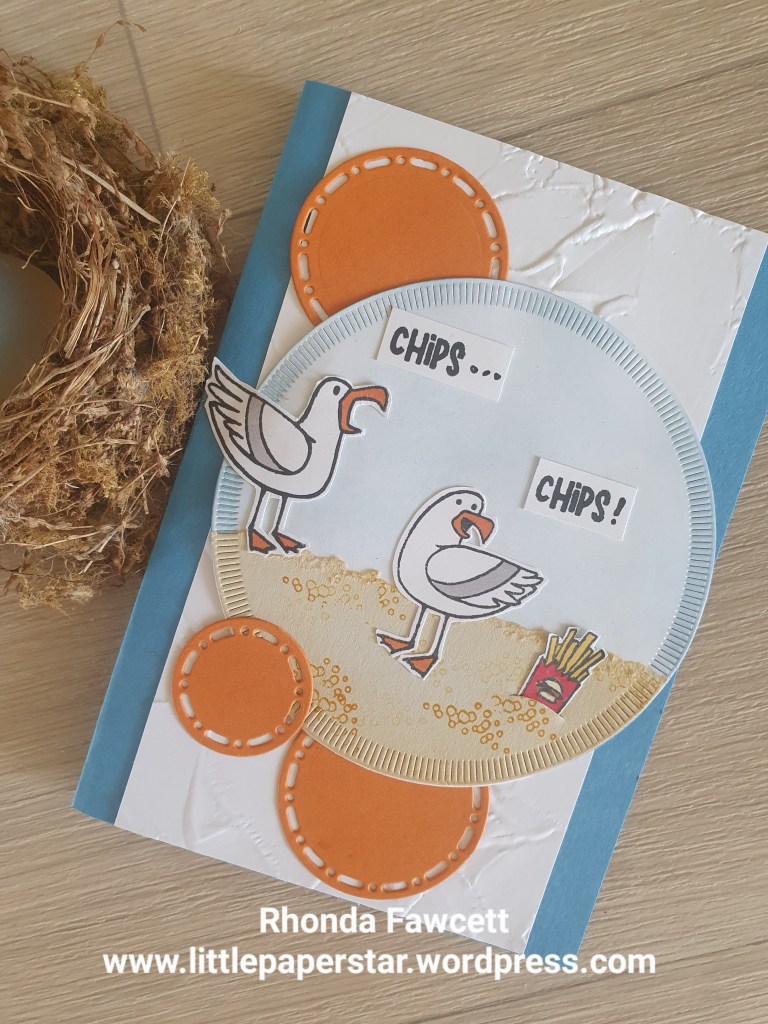
Here is another card made using the free Sale-a-bration stamp set called Friendly Seagulls.
For this card, I was teaching the technique of water spray on sponged background. We started with a basic white panel 10.5 x 8 cm and used a blending brush to sponge on Azure Afternoon ink. Then we used a water spritzer to spray on one good spray of water. The spray creates fine water drops which you can’t see straight away but as the card dries it becomes apparent.
We then matted our panel onto Lemon Lolly card (10.5 cm square) with the top and bottom edges torn.
We cut a piece of Pecan Pie card for the wharf piles. 9.5 x 2.2 cm. We embossed with the timber embossing folding and sponged with Pecan Pie ink. We cut into two portions. One 5.5 cm long and one 4 cm long. Corner the ends and tied Crumb Cake baker’s twine around. Our Seagulls were fussy cut to sit on top.
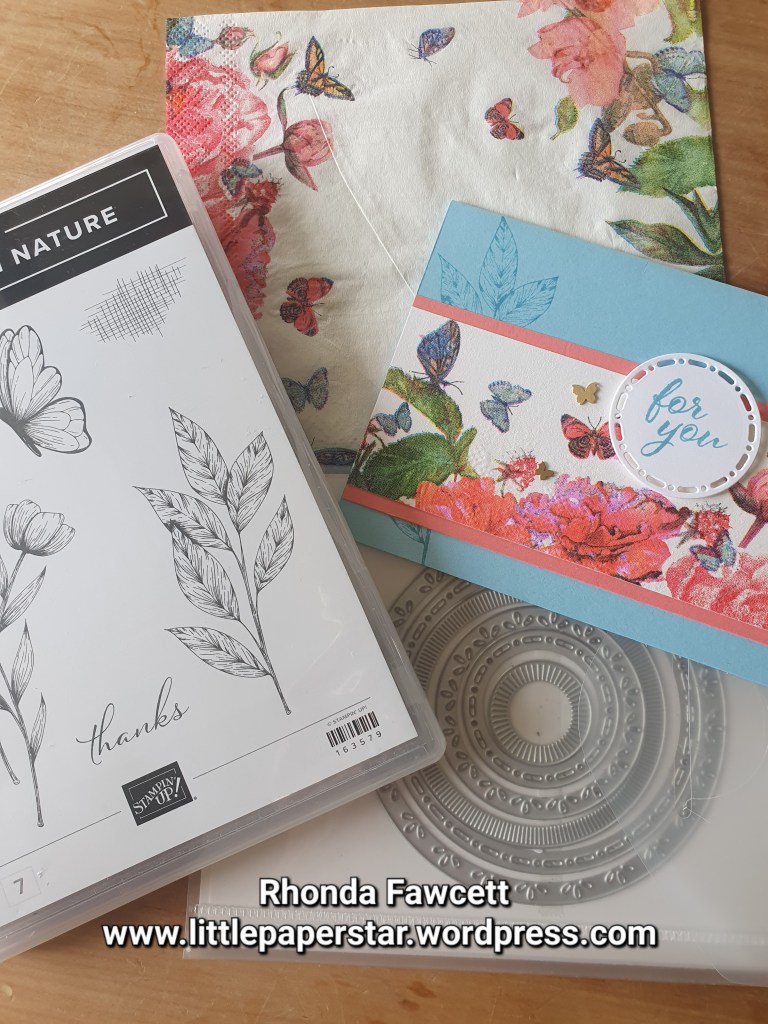
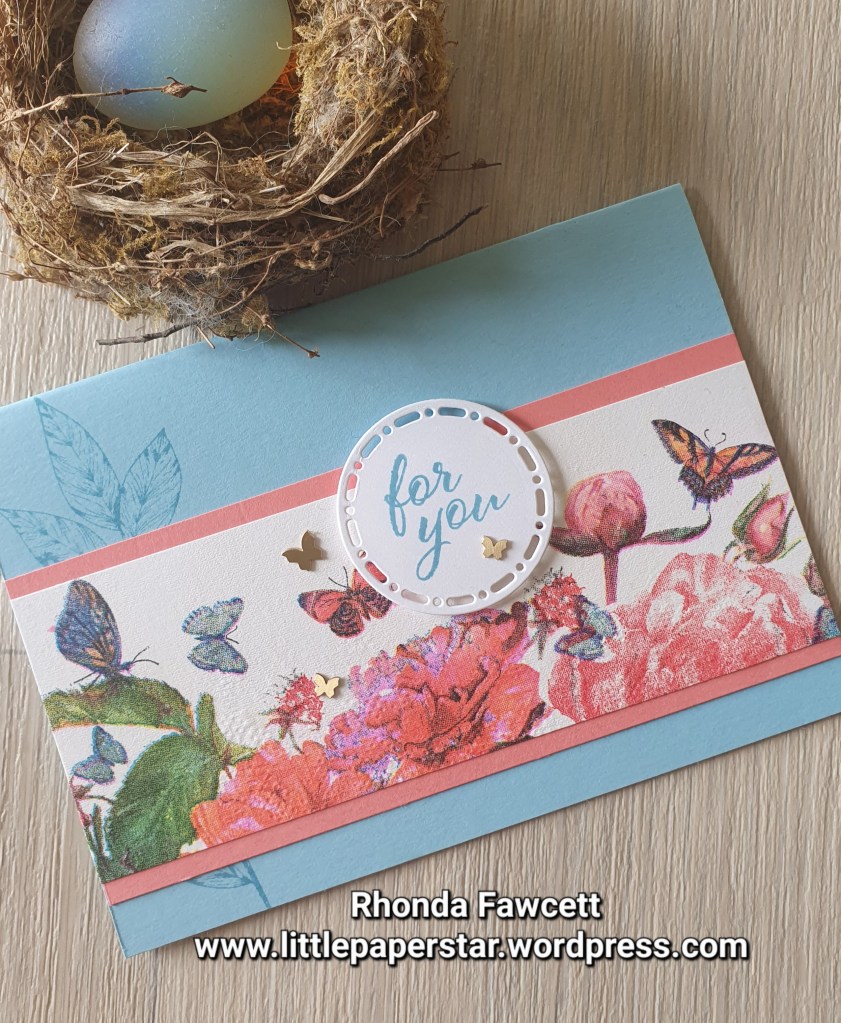
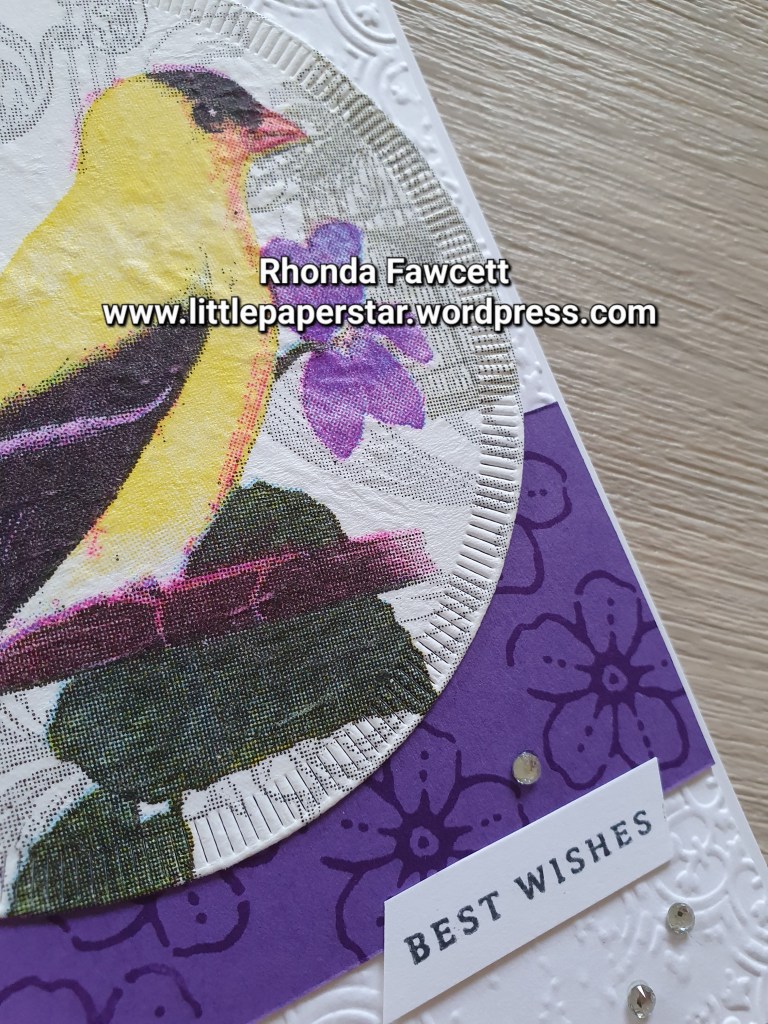
There are so many pretty serviettes out there. I wonder if any of you, have been like me and have picked up a serviette at a function, thinking this is too pretty to wipe my fingers clean, I am going to pocket it instead and use it for something someday – so others can appreciate its beauty too?
I have made some canvases (wall art) in the past with serviettes and a paper glue, but finding this easy way to transfer them onto card fronts was a game changer. (Way less wrinkles and way less mess!)
For this card, I used the spotlight on nature bundle and a sentiment from layering leaves. I used Balmy Blue and Flirty Flamingo cardstock to match the colours in the servitte.
I purposefully didn’t add words inside this card so I could you for a a variety of occasions later on.
If you are still reading, you are probably wondering when I am going to tell you how to actually make these cards…
Here goes: The main points are to use a hot iron with no water in it and iron it on a very firm surface. I used a wooden chopping board. You MUST make sure that you use the top layer of the serviette only. Some have two layers and some have three layers. Peel away the one or two bottom white paper layers and keep the top layer with the picture on. Make your sandwich like this: *Wooden board *Baking Paper (this will protect the card from burning) *Cardstock (piece of white or vanilla) *Plastic cling wrap (cut a piece to cover the card and lay it out as flat as you can) *Picture Serviette – right side facing up *Baking Paper (again needed to stop paper serviette from burning) Make sure that the baking paper covers everything – you don’t want to get plastic cling wrap on your iron as it will ruin the iron. Iron for about 10 to 15 seconds in one area. Press down firmly. Then move onto another area and repeat. Lift off baking paper and see if the picture is attached. If the picture is lifting off at the corners, just continue the process. I used card stock larger than needed. I trimmed off the excess card, serviette and cling wrap when finished.
Bird card with serviette. I made this one using a bird patterned serviette. I adhered it all together as described above, then die cut it out with one of the circles from Spotlight on nature dies. The stamps are from Sentimental Park stamp set.
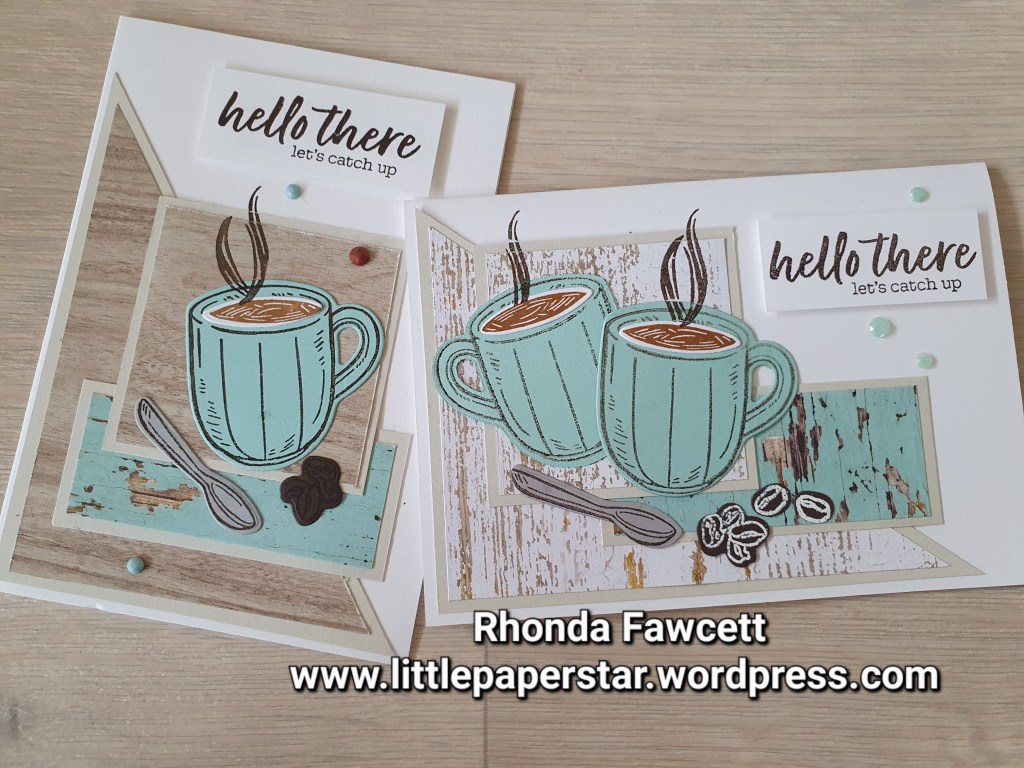
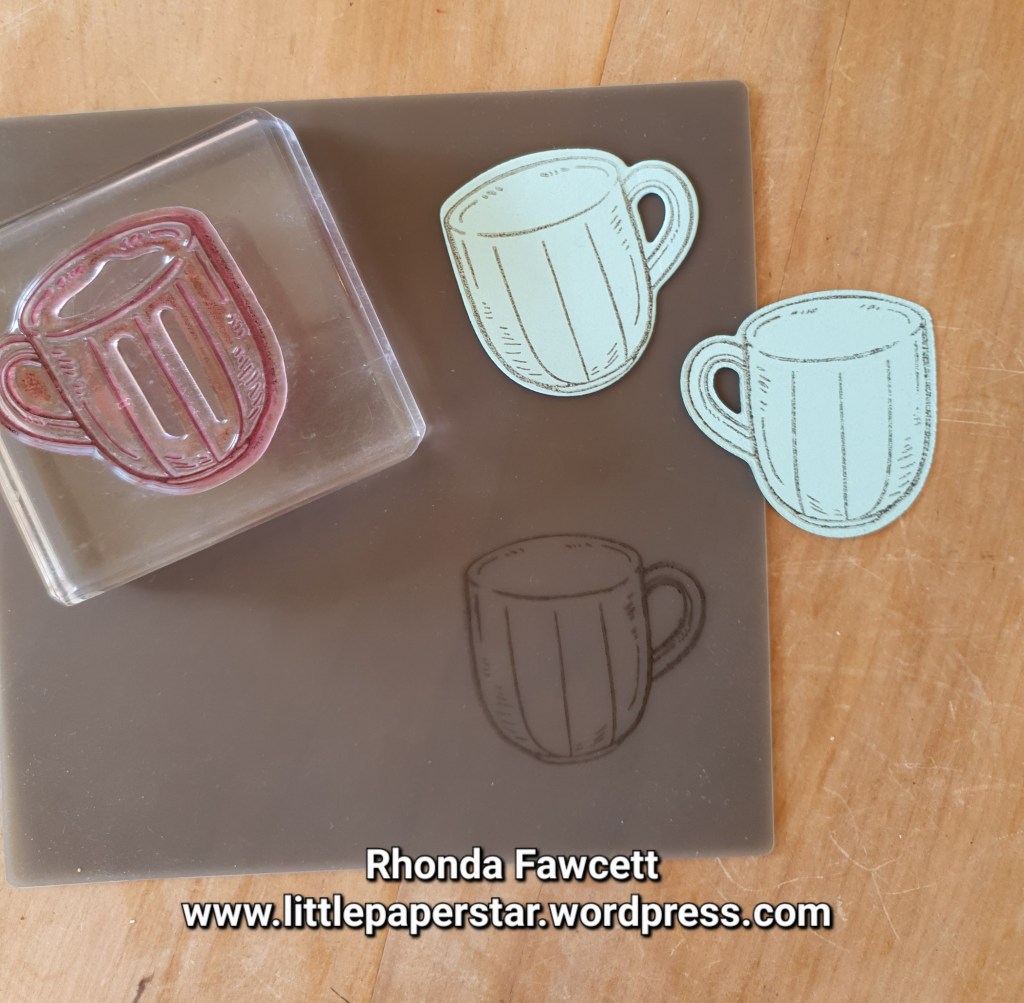
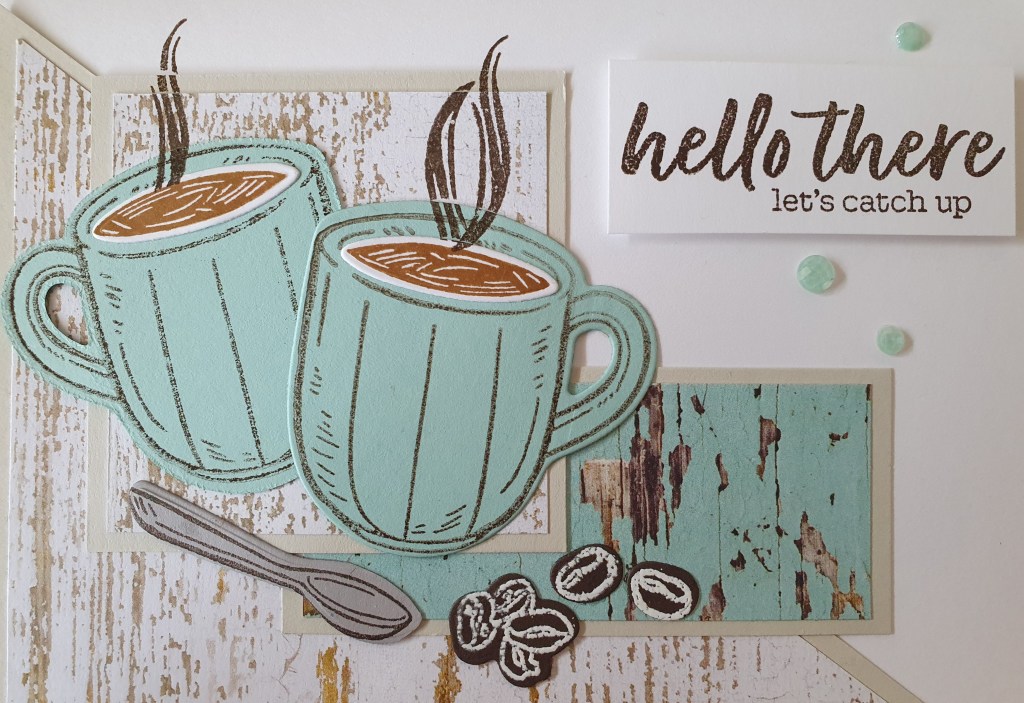
I love these coffee cards. We made them at a team day using a one sheet wonder, which gave us two cards from one sheet of Designer series paper. The paper we used is called Country Woods by Stampin’ Up!
The layout is similar for both cards but the orientation has been changed. For the landscape orientation, I added two coffee cups. I wanted the handle on one of the cups to go the opposite direction, so I stamped it on my silicon craft sheet first, then pressed my Pool Party card onto the craft sheet to pick up the stamped image and voila, it is a reverse image. It’s that easy. The only thing is the image is lighter. I stamped off my right side facing handle coffee to make it lighter to match the one I did with the silicon sheet.
I used white embossing powder to do the coffee beans as they are hard to see on the Early Espresso card.
And of course, I had to stamp the inside. The stamped images are coloured in using Stampin’ Blends.
I made this card to showcase another way of using our Stampin’ Up’s Blends. This panel on the side is made using a strip of window sheet coloured with Blends, then spritzed with alcohol.
It is a fun technique. It’s easy to do. The longest part is waiting for the alcohol to evaporate so that the ink is properly dry. I ended up using a heat gun to speed up the process which is a good ideas because it spreads the ink around more and creates the marbled look you see on my card.