Layers of Beauty

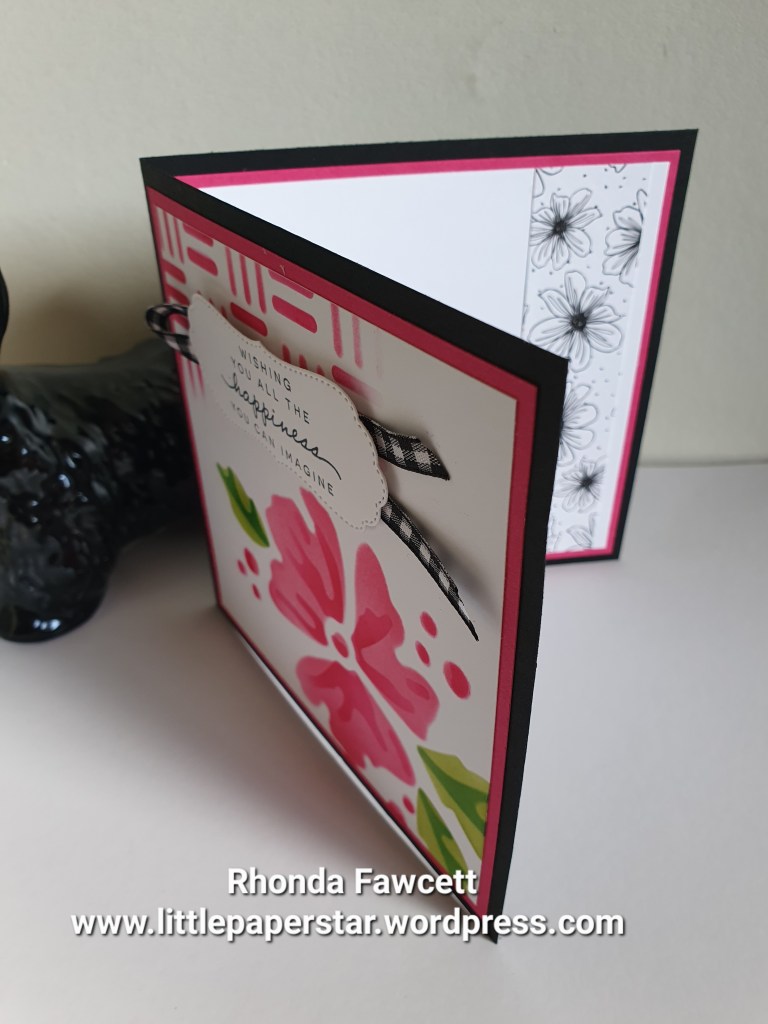
Here’s a card I made at our recent Stamp Camp. It was taught by Leoni Cane. I loved the technique of sanding the two tone paper to further highlight the pretty embossed background.

The stamp is from the Layers of Beauty bundle, which includes decorative masks, (stencils), dies and stamps.

The DSP is from Nests of Winter paper pack. It worked well with the Pool Party two toned paper.

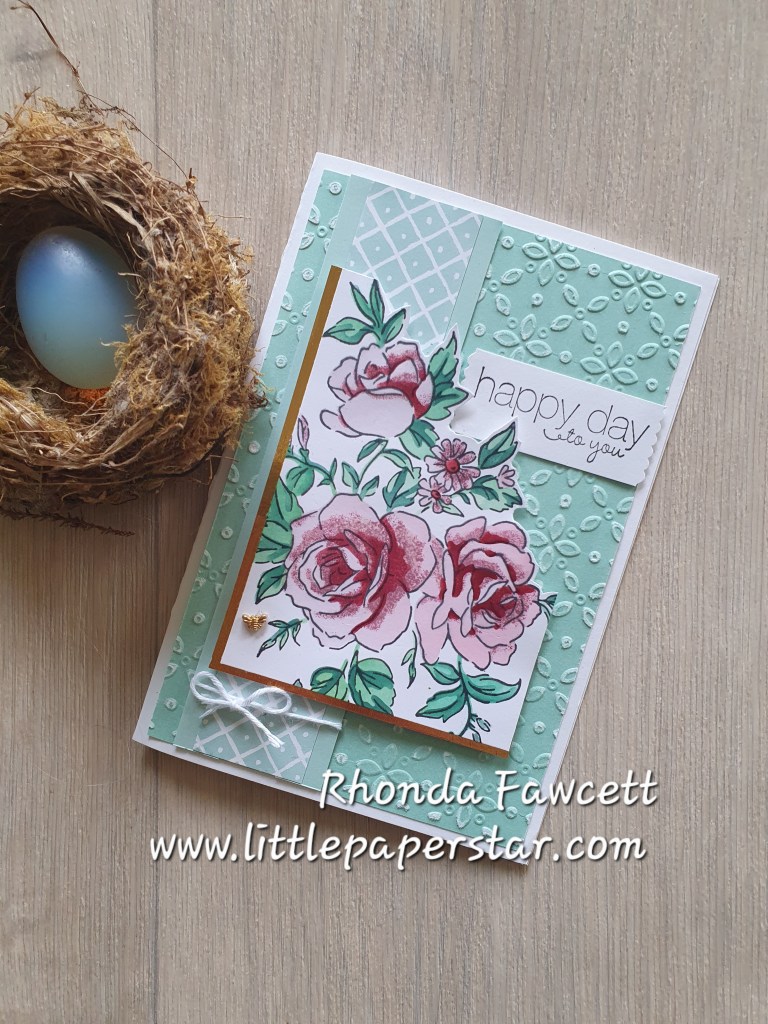
The stencils make colouring the flowers so easy. For the lightest and darkest colours, I used a blending brush. For the middle colour, I used a sponge dauber and dabbed colour on. It gave a more mottled effect, whereas the blending brushes give a very smooth finish.I added Wink of Stella to my flowers for an extra sparkle.

How cute is the little gold bee? A perfect finish to this card.

Party Piggy in the sun

I’m in love with the Party Piggy stamp set. This happy smiley, pig makes me smile too!

For this card, I sponged on some sun rays, hand drew a shadow then I glued on the pig. I paired the Party Piggy bundle with the Notes and Totes bundle and was excited to find the Notes and Totes sunglasses fit the pig perfectly. I popped the glasses on dimensionals.

The sun stamp, the sentiment and the inside words (relax and enjoy) are also from the Notes and Totes bundle.

Sketched Butterflies

Here’s a recent card that I taught in my classes which is taken from a sketch challenge.

The challenge is to take an idea or sample from the Stampin’ Up! catalogue and use it as inspiration for your card. Here is the idea…

If you visit CASE-ing Tuesday Sketches you will be able to see more and take part in the current challenges.

My finished card was inspired from one made by Jolanda Johnstone. If you visit the CASE-ing Tuesday Sketches you will see her card and find that I have changed mine up quite a bit from her original design. I kept the sponging elements, on the background and butterflies as I thought the casual colouring of the sponging worked well with the sketched look of these stamps. I wouldn’t want to colour these butterflies too precisely and lose that casual sketched look.

I decided to do something different for the inside of my card and I made a simple pop up card.

This is done on a insert card which is slightly smaller than the base card. I folded my insert card in half and made a pencil mark 4 cm mark on either side of the fold line at the top and another 4.5 cm down on the fold line. Then I scored down both sides to make the angled pop out piece. I added some butterflies to the left hand side. When the card is open the butterflies pop up but they fold back down when the card is closed.

Beach Buddies

Here is another card made using the free Sale-a-bration stamp set called Friendly Seagulls.

For this card, I was teaching the technique of water spray on sponged background. We started with a basic white panel 10.5 x 8 cm and used a blending brush to sponge on Azure Afternoon ink. Then we used a water spritzer to spray on one good spray of water. The spray creates fine water drops which you can’t see straight away but as the card dries it becomes apparent.

We then matted our panel onto Lemon Lolly card (10.5 cm square) with the top and bottom edges torn.

We cut a piece of Pecan Pie card for the wharf piles. 9.5 x 2.2 cm. We embossed with the timber embossing folding and sponged with Pecan Pie ink. We cut into two portions. One 5.5 cm long and one 4 cm long. Corner the ends and tied Crumb Cake baker’s twine around. Our Seagulls were fussy cut to sit on top.

Friendly Seagulls Card

I made this card to show my team how to use the sketches on page 22 of our annual catalogue as inspiration for them to make their own cards.

You can see the full video where I show the original sketch here. https://youtu.be/G3Yk0k3HP4o?si=zV14k70dyrQ2k8bX

The inside of my card has a stamp from the Ice Cream Swirl stamp set.

Using stencils for cardmaking

Earlier this year, Stampin’ Up! brought out a layering stencil called Loveliest Layers Decorative Mask. It is a fun stencil to use as it creates a big flower using four different layers of stencils. (Two for the flower and two for the leaves).

There is also a lovely patterned stencil to make backgrounds with. I used it for the top of my card.

I made a big square card (13.4 cm square) as it was a good size to show of the flower. I used Polished Pink and Melon Mango inks and a blending brush to add ink

The inside of the card has a strip of patterned called Pattern Party Designer series paper. It was from a pack that I bought last year.

Sweet Songbirds

I made this slimline card as an entry into a card challenge. Colour INKspiration # 124. The colours to use were Daffodil Delight, Parakeet Party, Tahitian Tide and Night of Navy. I also used black to stamp the birds eyes and a bit of crumb cake for the branches. To enter this challenge go to Colour INKspiration challenges on Facebook or Instagram #colourinkspirationchallenges

I used my blending brushes to do a lightly sponged background. The clouds were free hand cut from a piece of scrap paper to make a stencil to sponge over. I used a few of the stamps from the Sweet Songbirds stamp set but the main part of the bird is created with the corresponding punch.

The reason I love the punch so much is that I can easily change the orientation of the bird by flipping the card over once I have punched it out.

Let’s set sail.

I had a day in my craft room today, to just play. It is rare these days as mostly I am on a tight time frame to get ready for classes. Anyway I decided to take part in a challenge and I chose a #justaddinkchallenge. It is a colour challenge. #jai608

I certainly picked a hard one. I hardly ever use these colours. And certainly not these four on their own. Anyway after a couple of failed attempts, I finally came up with this card.

Do you like it? I used the stitched rectangle dies, the horizon dies and the sailboat punch. All the stamped images are from the Let’s set sail stamp set. I used Wink of Stella on the reflection of the setting sun over the water. It’s a little hard to see in a photo but looks pretty in real life.

I kept the inside of the card fairly simple.

If you would like to take part in this challenge head over to just-add-ink.blospot.com and have a go.