Sharing my love of all things paper-craft: Card making, Scrapbooking, Gift Boxes, Invitations, Party Favours, Craft Supplies and more. (Formally Stampin'Fantastic)
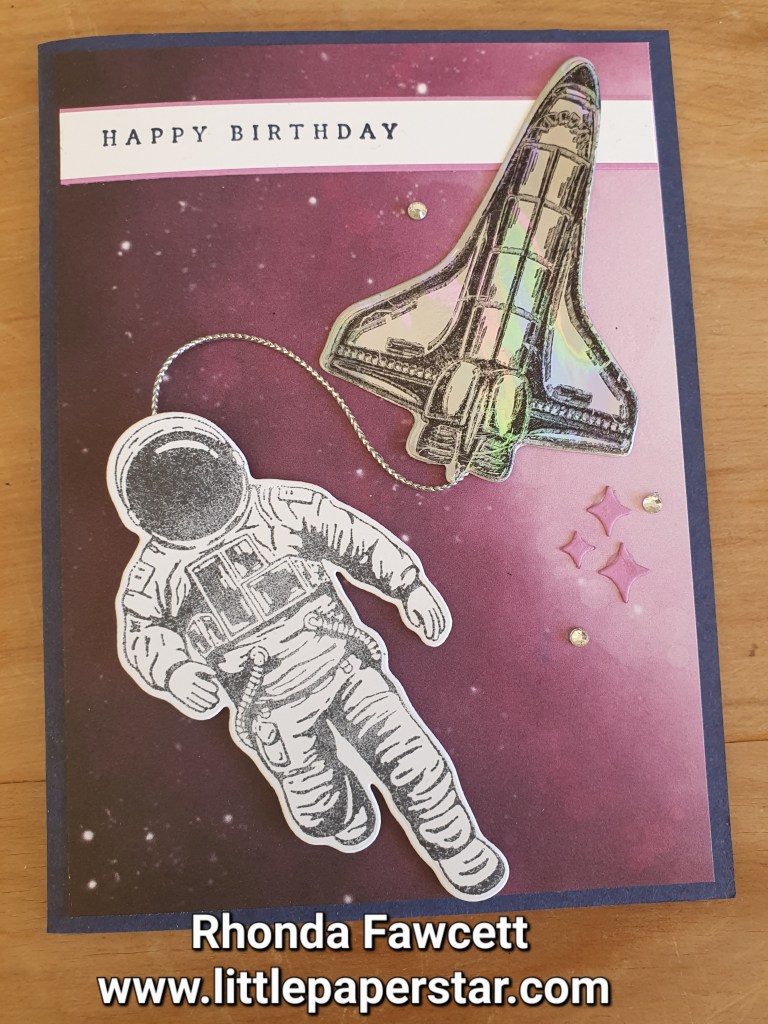
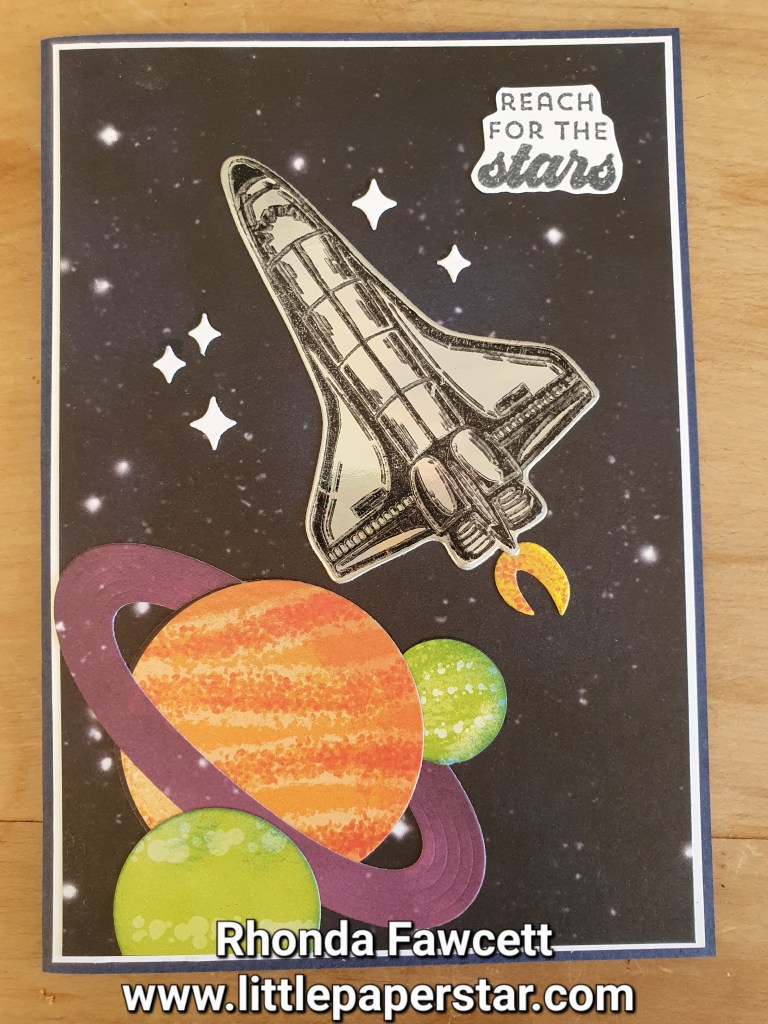
I had fun making these birthday cards using the Reach for the stars bundle of products. The patterned designer series paper makes the perfect background for these two cards.
Do you like the rocket ship? It is stamped on holographic paper.
This bundle and the holographic paper are all retiring this month. April 2024. So if you like what you see, make sure you contact me to place your order.
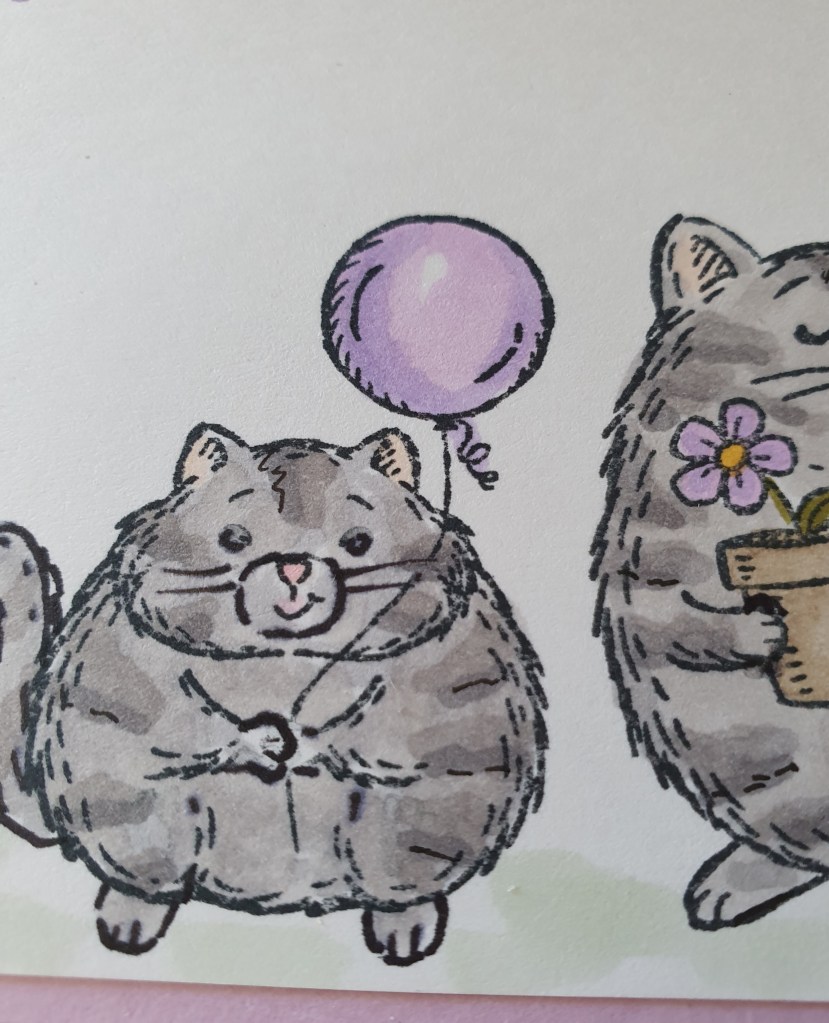
I love the cute animal stamp set, Fluffiest Friends You may not have noticed this set before as it is not in any printed catalogues. Instead it is available exclusively as an online offering from Stampin’ Up!
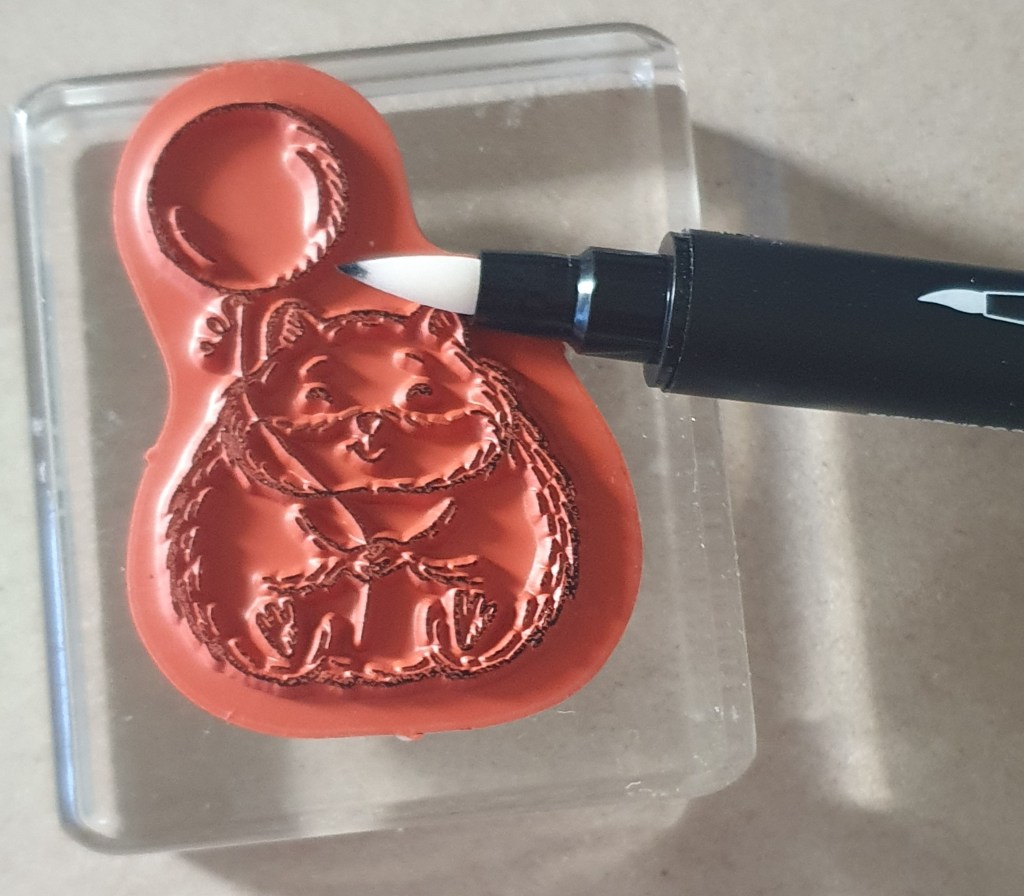
.I decided to do a card with a cat for my granddaughter and I thought that the little hamster also would make a great cat.
First I inked up the hamster stamp, then I used a blender pen to remove the ink from the hamster’s face and paws. If you are going to try this technique make sure you take a few goes at removing the ink from each part, wiping the blender pen clean between each go, to ensure you remove all traces of ink from the portion of stamp where you want it gone.
Because this took more than a few seconds and the ink may have dried on the stamp, I huffed on it, to moisten the ink with my breath. Then I stamped the image. I used a black stampin write marker to add in the face and whiskers to match the larger cat. I added cat paws and a tail.
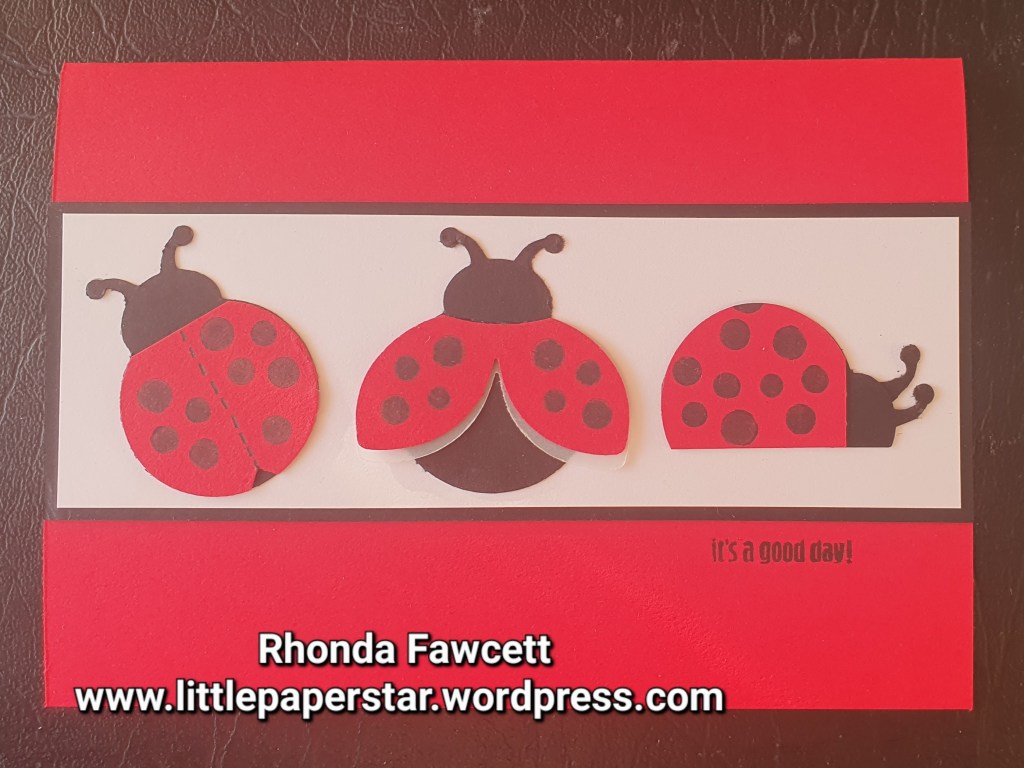
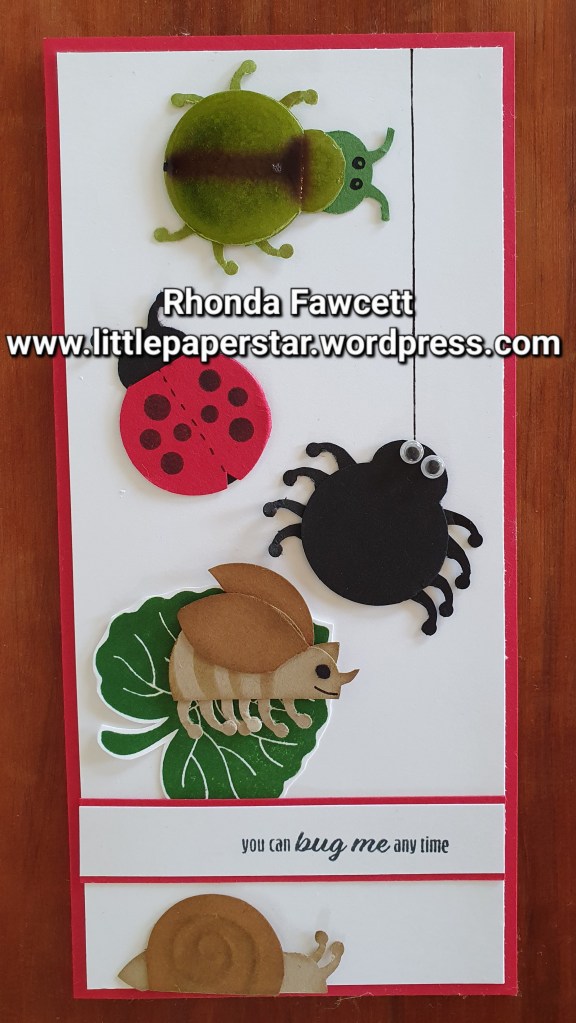
I was playing with the ladybug punch last week and I wanted to create some different styles of ladybugs so I made this card.
For the first bug, I punched two bodies, one in black and one in Real Red. I cut the head of the red one and drew a line on it, stamped some dots and attached it on top of the black one. For the third ladybug I punched two bodies as before but this time, I cut a straight line off the side of both bodies. I attached the antenna that I had cut off beside the other one. This ladybug reminded me of a snail, which got me playing to see what other bugs I could make.
The snail was made the same way as the third ladybug. I just added a small portion of a wing tip for the end of the snail. The shell was embossed using the embossing tip of my Take Your Tip tool and then rubbed over with a dauber using Pecan Pie ink to highlight the swirl.
The butterfly started of as a Crumb Cake body that I cut a portion off each side. I then punched out two lots of wings. The butterfly body was still too short so I added an extra double punched wing tip to add more length. Where the extra piece joins the body is where the wings meet to cover the join.
The back side of these critters looks rather messy but I am showing you to give you an idea of how I add the extra legs etc.
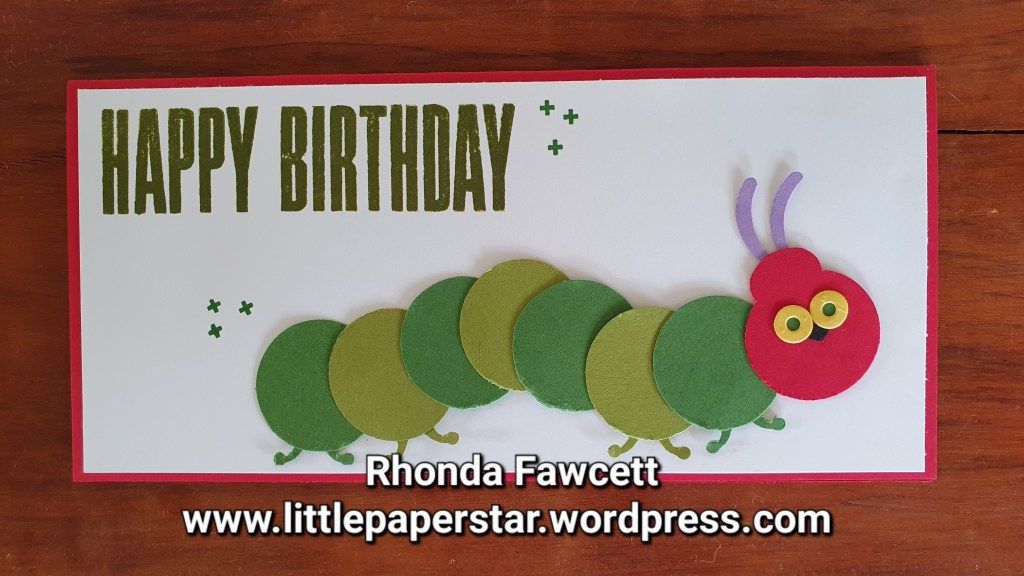
You can’t have a butterfly without a caterpillar right? So I decided to make that next. But the punch didn’t really lend itself to a caterpillar shape. I Googled caterpillar images and found the classic children’s story book character, hungry, hungry caterpillar and so made that instead.
Next I decided to put all my critters on a card. I used google glue on eyes for the spider. I made a rhino beetle and a shiny green beetle. The green beetle was made by punching one body from Old Olive and one head from Garden Green. I drew a line on the olive body then covered the body in a layer of Fine Tip Glue. The glue made the ink from the marker pen run but I actually liked the final effect so I wouldn’t change it. The eyes are drawn on with a Stampin’ Write marker.
I think the sentiment works perfectly for this card. I am going to give it to my grandson for his birthday.
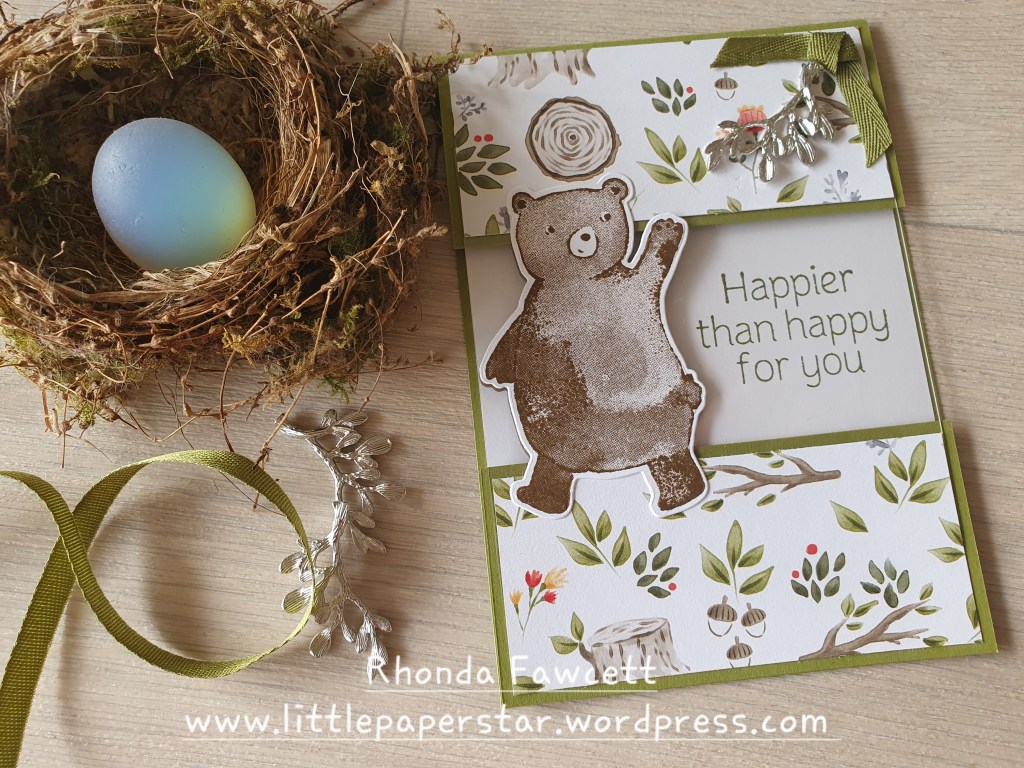
This is an easy fun fold card to make. Just cut a sheet of Old Olive A4 card in half lengthwise and fold in half. Then cut at 4.5 cm from the fold. Trim the cut off piece to measure 5 cm wide and discard the rest. Cut two pieces of DSP (Designer series paper) one at 10 x 4 cm and the other at 10 x 4.5 cm. Also cut a piece of window sheet to 10 x 11 cm. Lay the cut off Olive piece at the bottom of the folded Olive card so the bottom edges line up. There will be a gap in the middle. Glue or tape the window sheet to the Olive card to bridge the gap. Then glue DSP on top
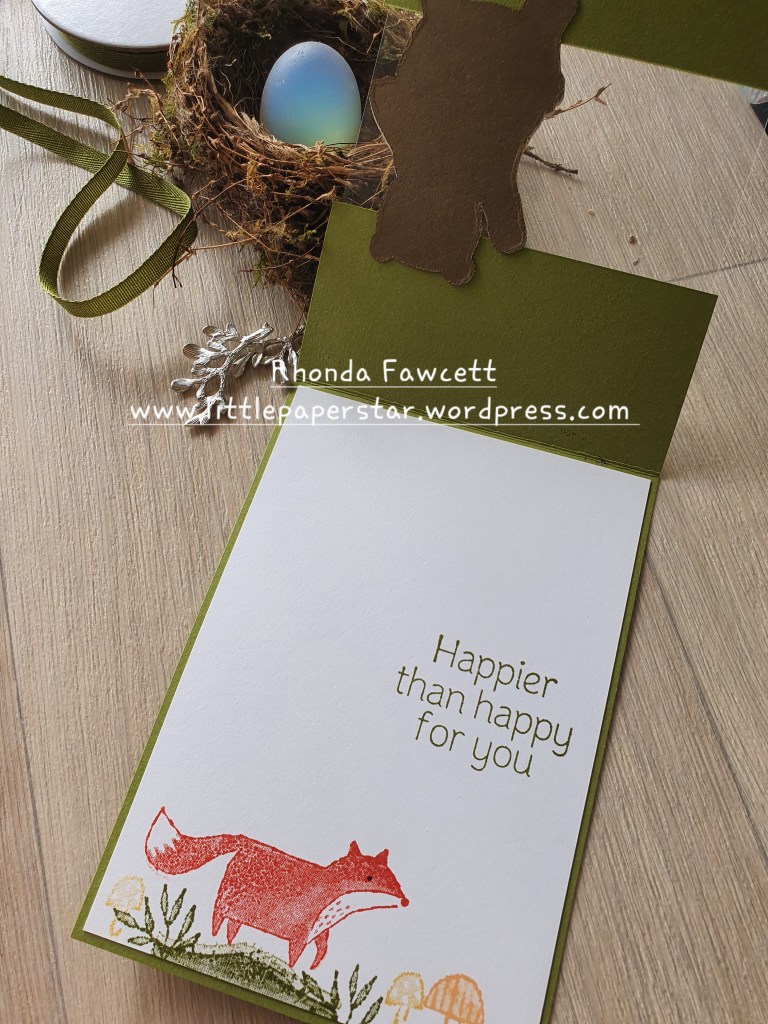
Decorate with the stamps and dies from the Happier than Happy bundle. Glue bear onto window sheet to the left hand side. Die cut a second bear shape from Soft Suede card and glue it on the underneath side of the window sheet to line up with the bear on the front. When you stamp the greeting inside, take care to position it so that it shows through the window at the side of the bear.
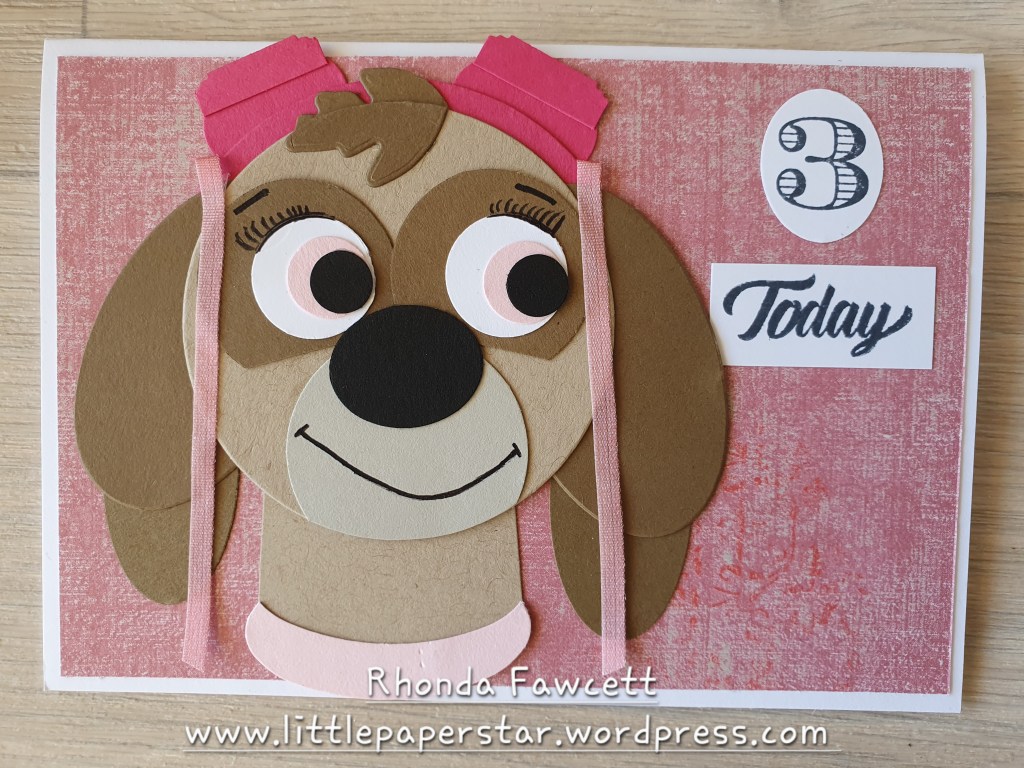
I went back to one of my favourite way of making cards and did some more punch art. I used a lot of retired circle and oval punches for this card. I have listed them all below.
Flynn loves Paw Patrol so making one of the dogs by using punches worked well for her.
I used woven threads DSP for the background paper. Head was the 2nd to largest layering circle die in Crumb Cake card. Muzzle was 1 1/2″ circle punch in Sahara Sand card. I glued the muzzle on with a small amount overlapping the edge and trimmed off the overlap. I drew in the mouth. Neck was hand cut from a piece of card 1 3/4″ wide. I tapered it slightly at the sides. Collar was large oval punch (retired). I also used this for the ears as well as a smaller oval from the retired layering oval dies. Nose was small retired oval punch 3/4″ size.
Eyes in soft suede card 1 1/4″ punch and cut across the bottom of circle. White 3/4″ punch. Pink pirouette 1/2″ punch. Black Itty bitty circle shape punch. Goggles were made using Melon Mambo card and largest layering circle die for head piece. Small ovals the same as the nose for eye piece with a best label punch cut in half and laid on top.
Finally hair pieces were die cut from a forever flourishing leaf die.
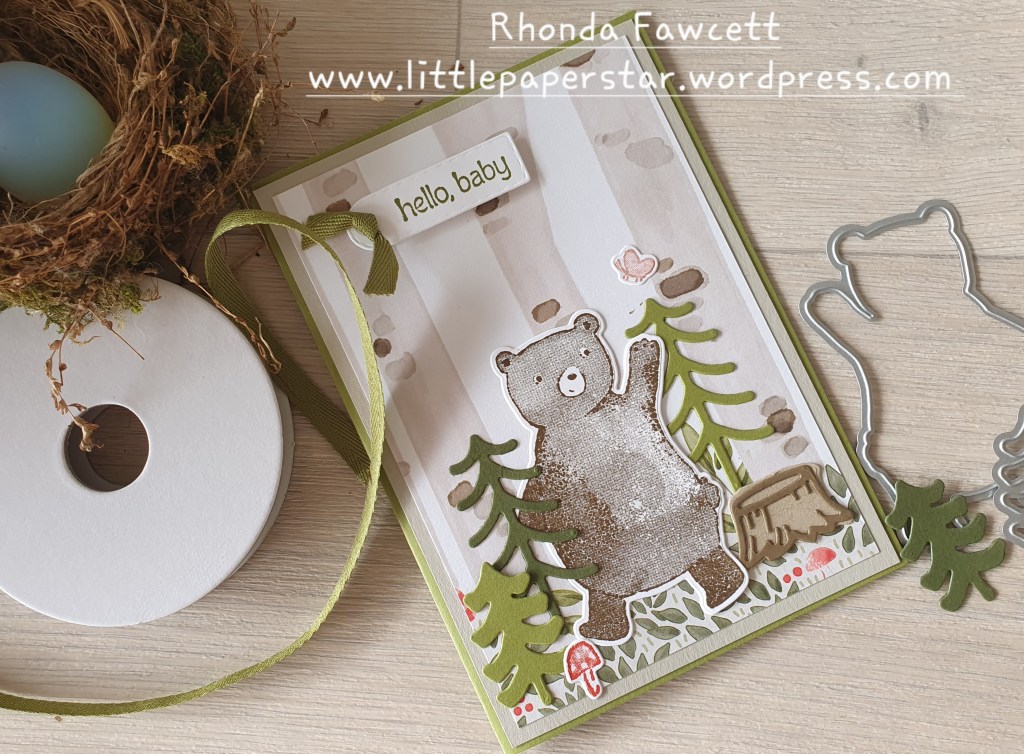
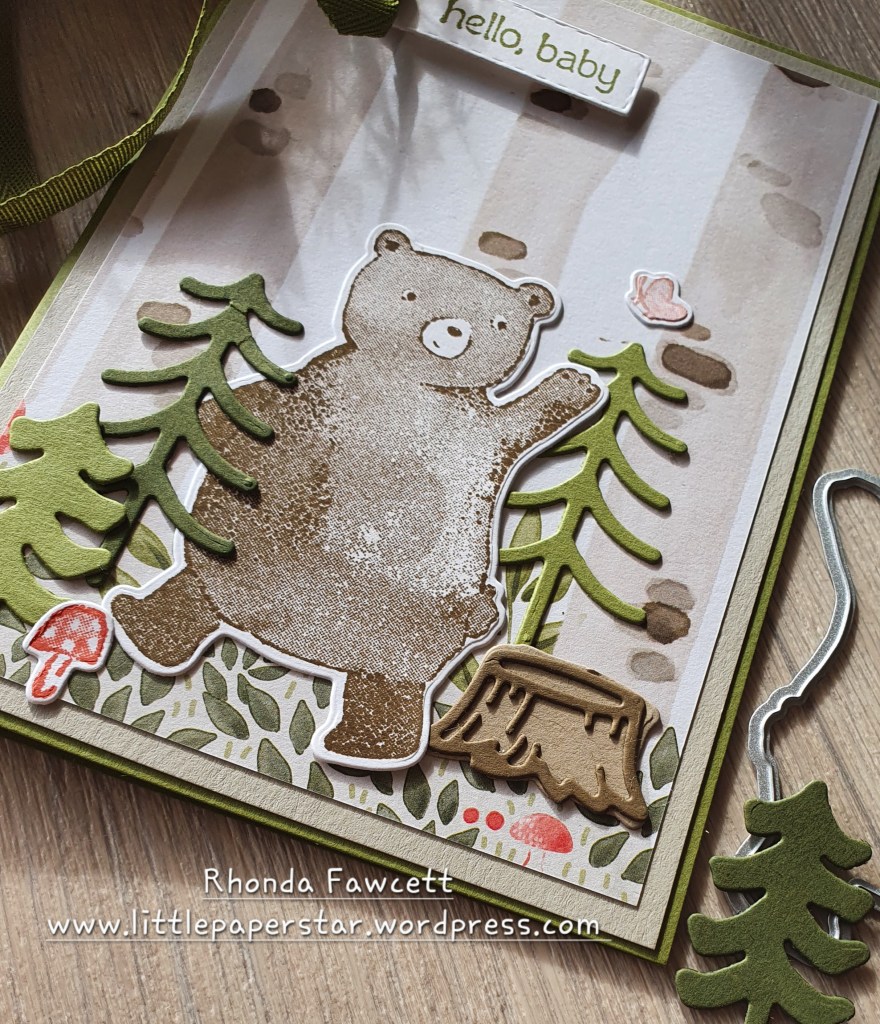
As soon as I received my new Annual catalogue, I fell in love with the Happy Forest Friends suite. I couldn’t wait to a have play. Here is one of the cards I made using some of the elements from the suite.
The bear is stamped and die cut out. The background is from the DSP (Designer Series Paper) pack, Happy Forest Friends. The ribbon is also from this suite and it is part of a 2 pack of lovely soft twill ribbon in both Old Olive and Sahara Sand.
This is a great set for baby cards if you want to get away from the traditional blue and pink baby cards. It will also make great birthday cards. I can just imagine the bear holding a balloon. What do you think?
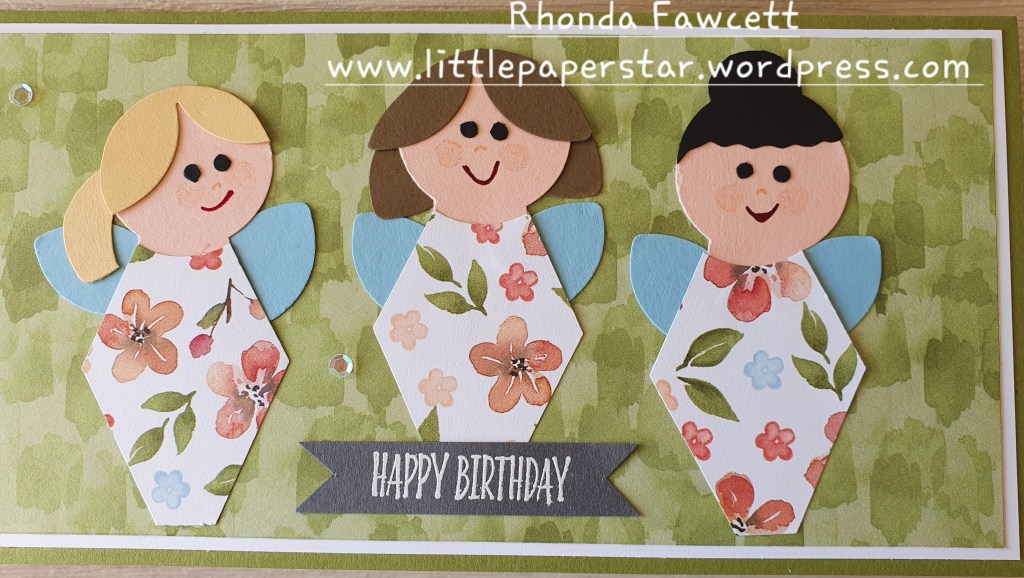
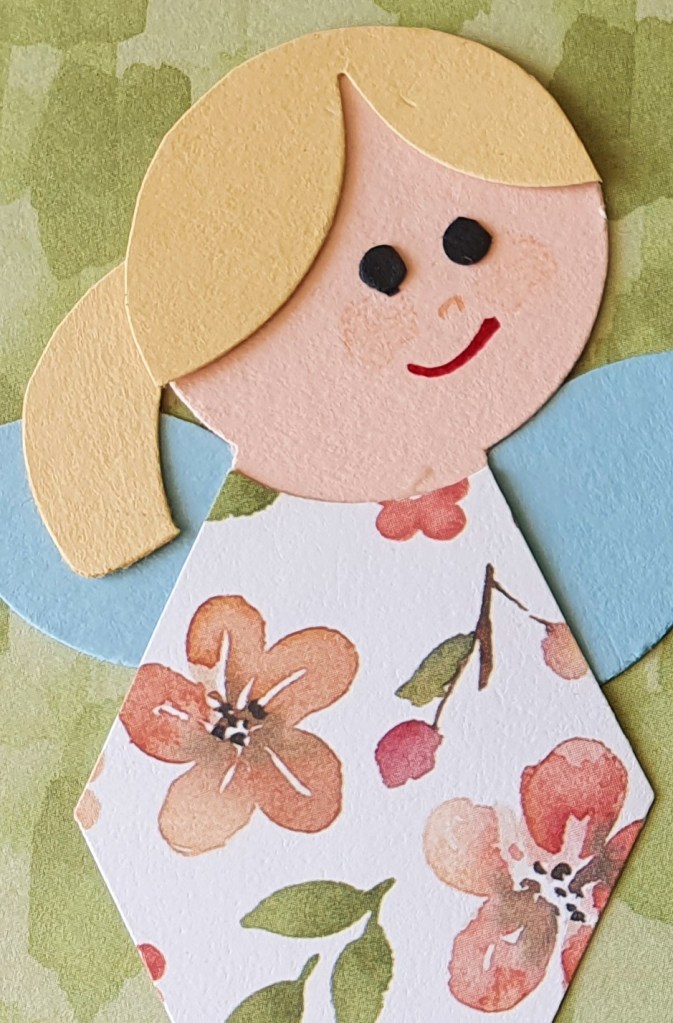
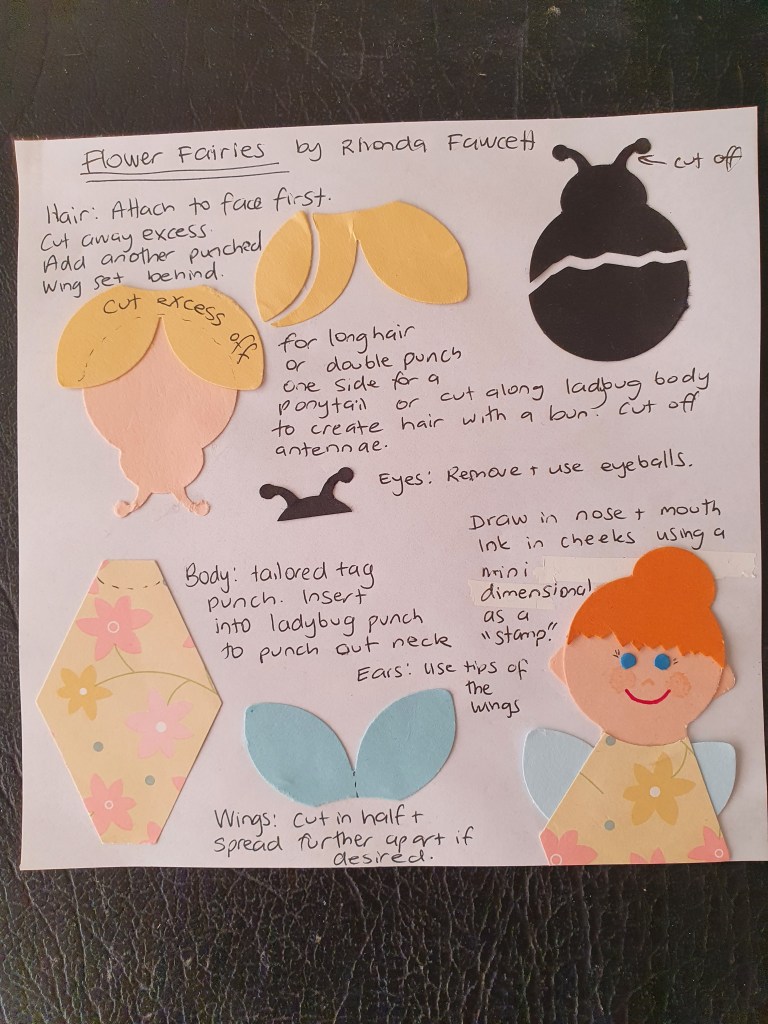
These simple Flower Fairies were made using the ladybug punch and Tailored Tag punch.
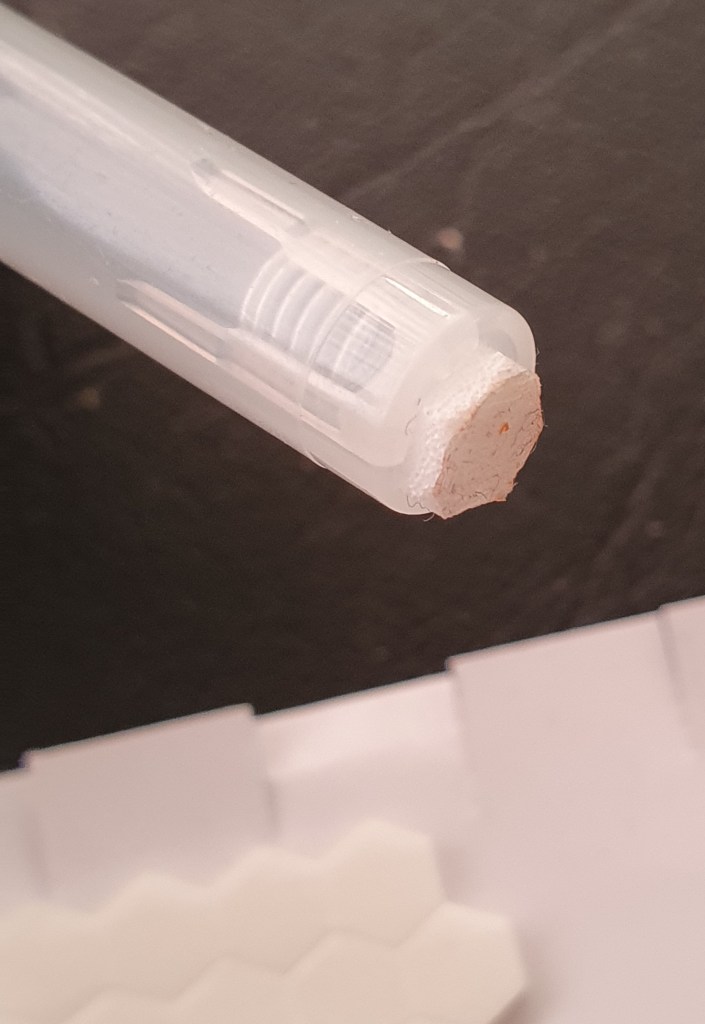
I used a marker pen to draw in their nose and mouths. I trimmed the points off a mini dimensional and placed it on the end of a pen. Then I used that to “stamp” some rosy cheeks on the fairy girl’s faces. I stamped off on scrap paper first so that the final result was quite subtle.
Below is a guide to how I put the punched pieces together to create the fairies on my card.
I didn’t give my fairies ears but it is easy to do, if you look at the example below.