Sharing my love of all things paper-craft: Card making, Scrapbooking, Gift Boxes, Invitations, Party Favours, Craft Supplies and more. (Formally Stampin'Fantastic)
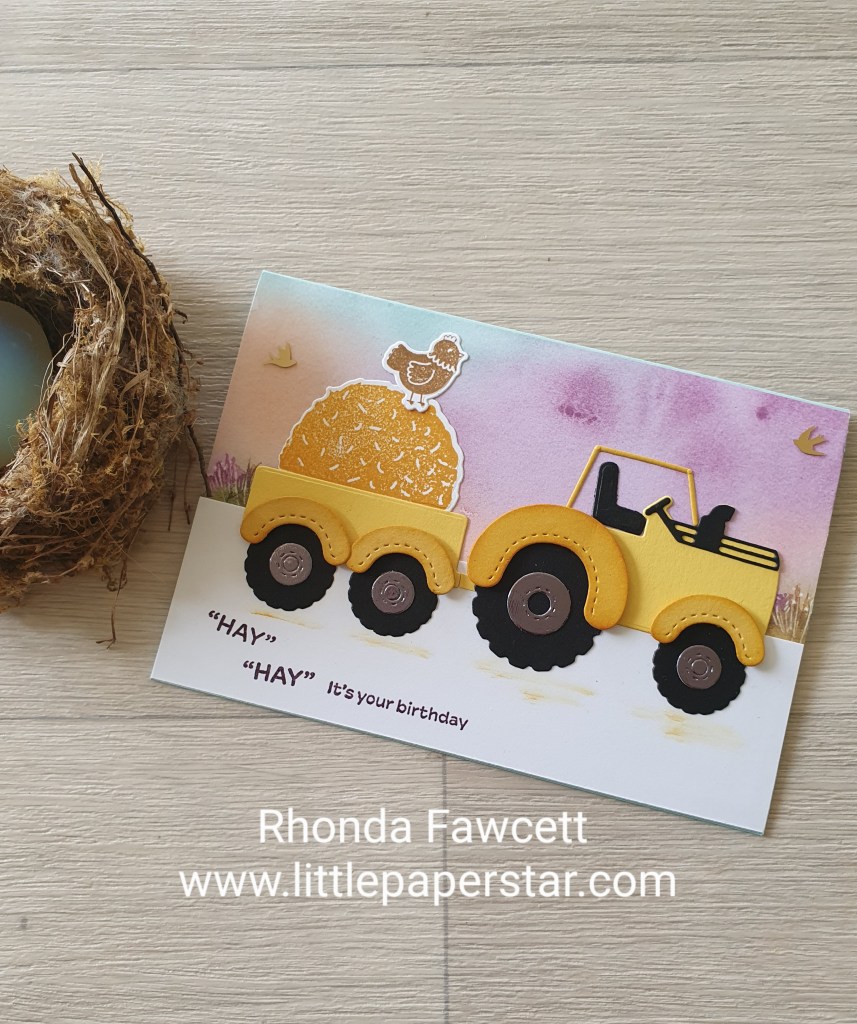
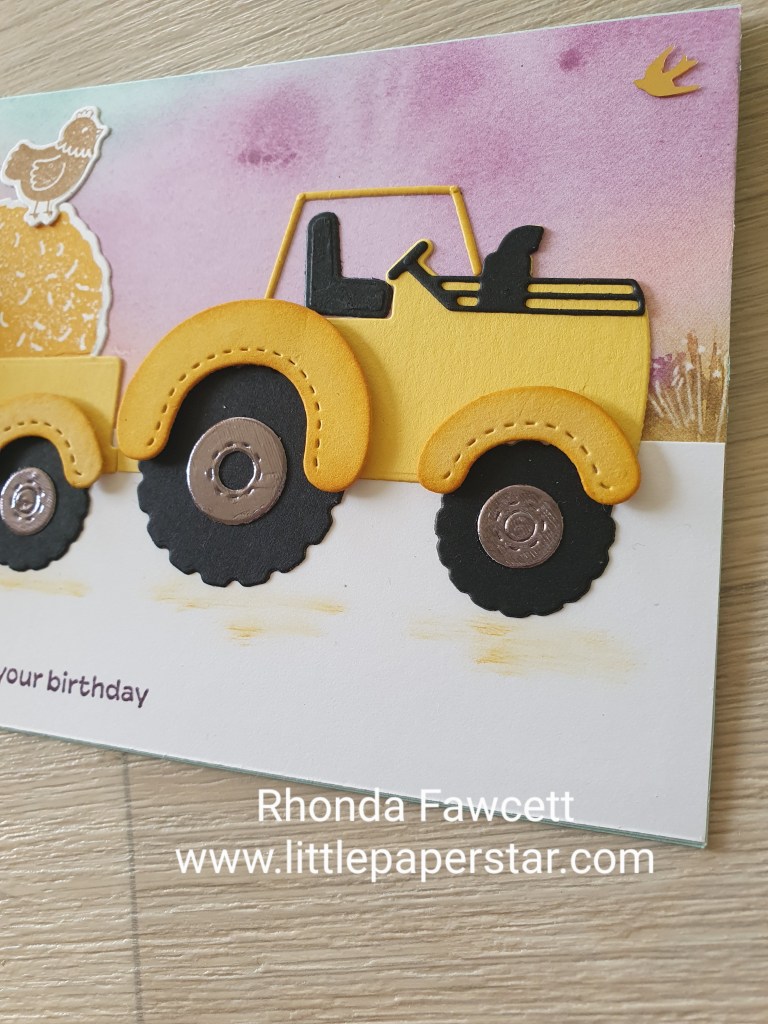
This birthday card was fun and easy to make using the Tractor and Co Bundle from Stampin’ Up!The Christmas version was taken from the Stampin’ Up! website and the birthday version was adapted from that.
The Thoughtful Journey DSP made the perfect sunrise background for the feeding out of the hay. The Christmas version had glitter foam star embellishments so for the birthday card I decided to use the brushed brass birds instead.
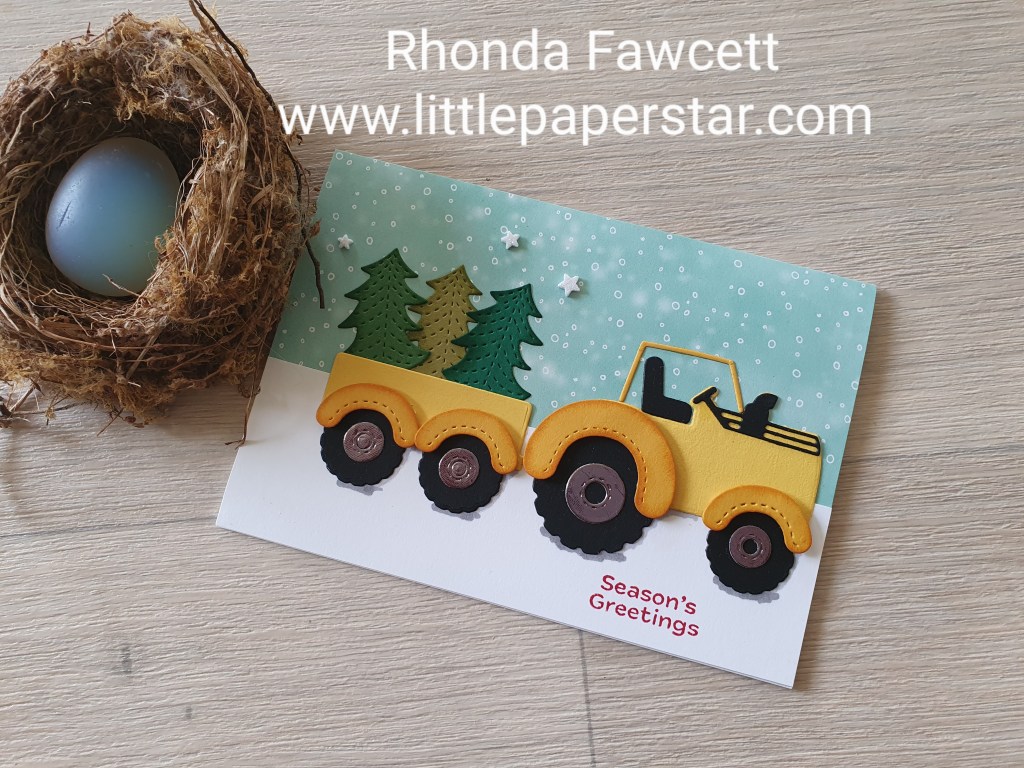
I used this fun tractor and Christmas tree die set to make a kiwi Christmas card. Tractors are a common sight around NZ but our Christmas time is always in summer so I wanted a Christmas card that showed that, and this is what I came up with.
I chose green and yellow to be like a John Deere tractor. These tractors also have a yellow stripe along the side, so I used the thin piece that makes the roof to die cut the side stripe.
Aren’t the Christmas lights cute? They are die cut from the heads of corn die (which is part of this same tractor set). They’re the perfect shape to make little lights!!!
Inside the card, I used the sentiment from the Notes and Totes stamp set and I sponged a bit of yellow on first to keep it looking bright and summery.
What do you think? Does it still look like a Christmas card even though it’s a summer Christmas?
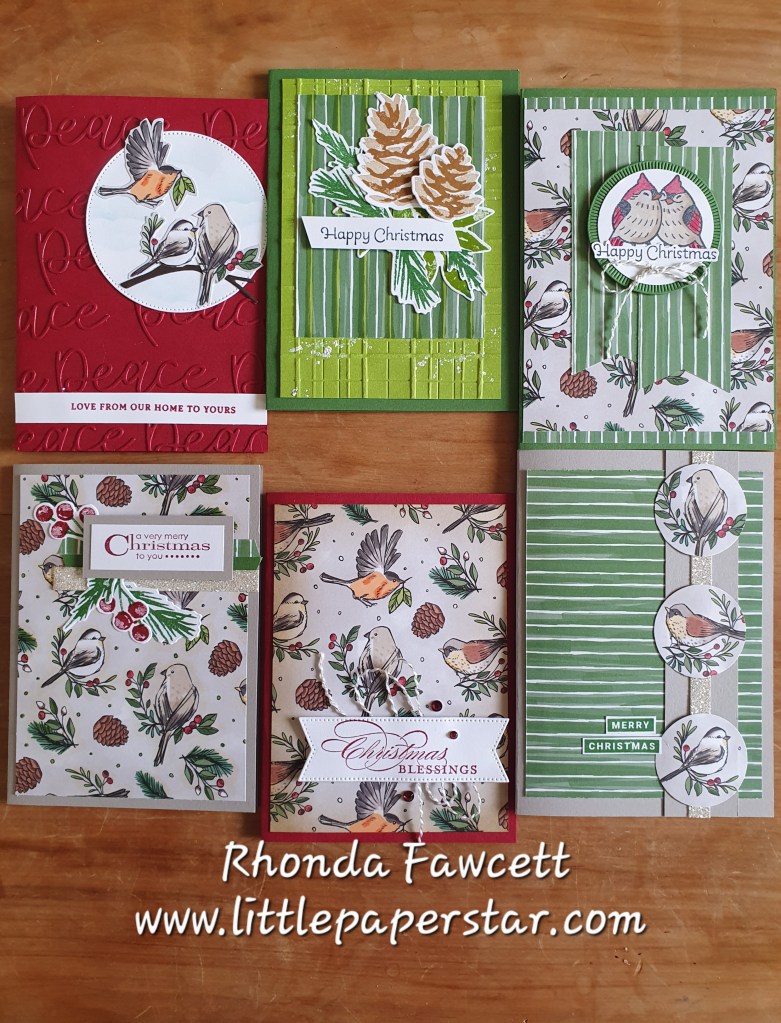
I recently participated in a demonstrator online event which showed us how to get the most out of one sheet of Designer Series Paper. (DSP). We made 6 cards, all using different techniques and using sketches from page 52 of the new Christmas mini catalogue.
We cut our DSP into the separate sections that we needed for each card, then using different colouring and cutting techniques we made our 6 basic cards. Once we completed the 6 templates we went back and added sentiments and embellishments.
For this card, I used a retired Christmas greeting and cut it out with a Stylish Shape die. I matted it on top of the new gold and white twine.
The technique used here is sponging ink over the DSP for a different look. I chose to just sponge the edges with Crumb Cake ink. It gave a antique look for this card which I really loved.
Here are the rest of the cards I made using the sketch guide and techniques on page 52. If you want to learn what I did, follow me on Friday the 3rd of October where I will be doing a Facebook live demonstration of this One Sheet Wonder.
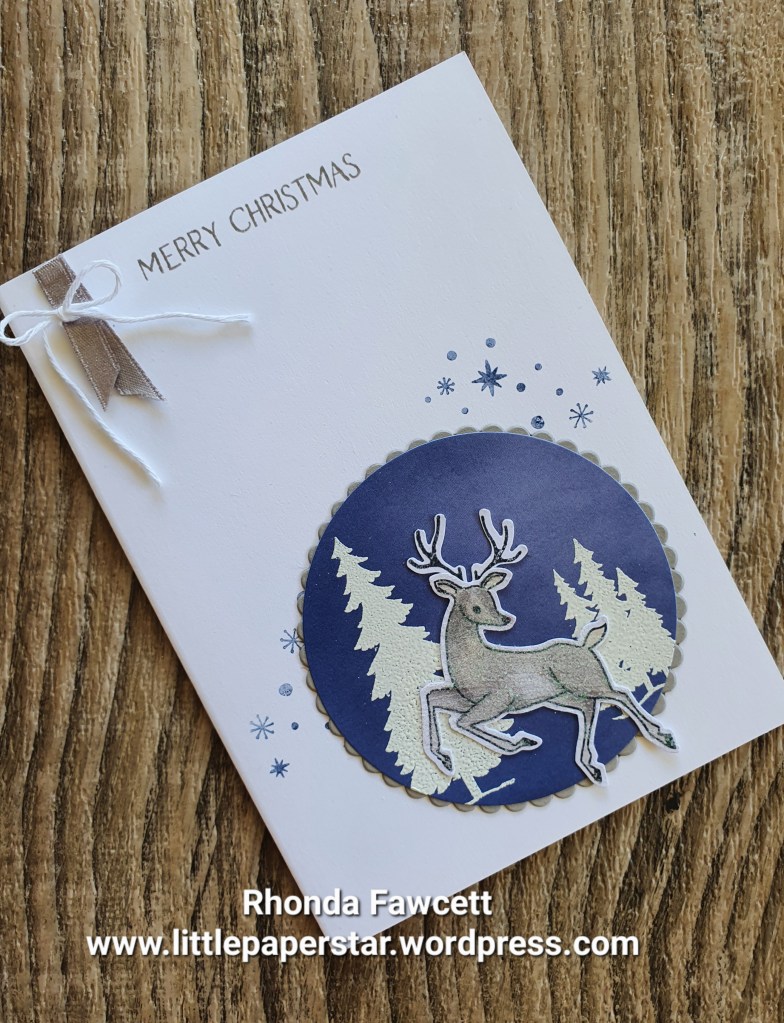
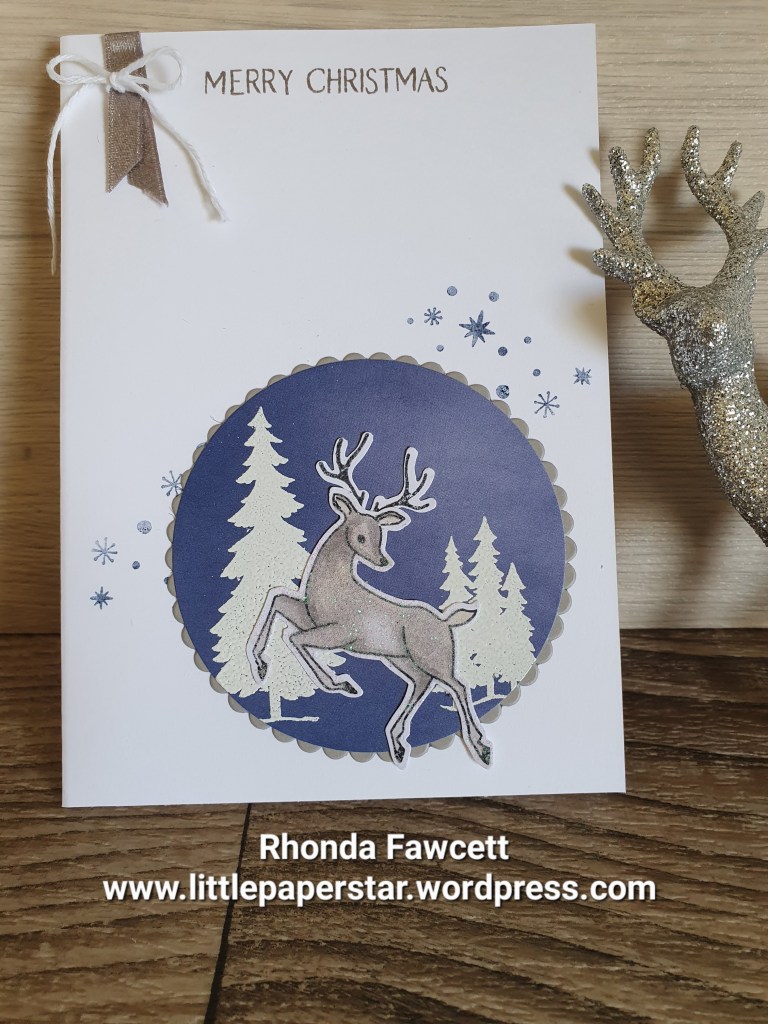
I taught a card in class recently using shimmer embossing paste over the top of the stamped and coloured image to add some sparkle. I decided to try it again on this Christmas card. This is also my entry for the Just Add Ink Challenge #JAI632 The challenge was to choose two items from the list of Deers, Trees, Sparkle. I chose Deer and Sparkle but there are trees in it as well. Bonus!
You only need a thin very layer of paste. You need to colour your image with Blends. I haven’t tried it with an image coloured with ink but I imagine the ink would run a little with the moisture from the embossing paste when you first spread it on.
If you live in New Zealand and want to recreate this card, you can order all the products from my online store rhondafawcett.stampinup.net
For this project, I used sunprints DSP for the blue circle. I stamped the trees from the Peaceful Deer stamp set in versamark and heat embossed with white embossing powder. I stamped the Deer in black memento ink and coloured it with Gray Granite Blends and a light Crumb Cake Blend. I then added a thin layer of shimmer embossing paste. Once paste was dry I punched it out and added it to the blue circle. I matted the blue circle onto a die cut Gray Granite scallop circle. (Layering Circle dies). I stamped the snowflakes in Navy ink. (Second generation to give a softer look to match the lighter blue on my paper). I adhered this to the bottom right corner of my thick white card base. I stamped a sentiment at the top with Gray Granite ink and finished the card with a strip of Gray Granite shimmer ribbon.
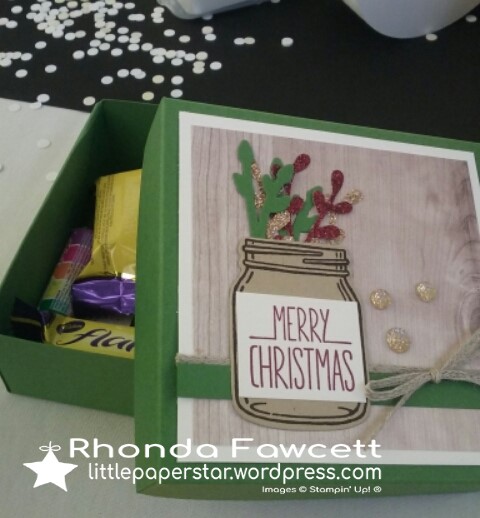
These boxes were made as table gifts for my team at our recent On Stage event. They contained sweets and a small acrylic stampin’ block. Each box is made out of two sheets of A4 card. One sheet for the base and one for the lid. It took me several goes using scrap paper to make my templates. I wanted the boxes to be strong and to look tidy inside, so there is an extra piece along the side walls that folds down and covers the joins. I also wanted the lids to be a nice firm fit and I was very happy with my end result.